New Scanning and Text Capabilities with VisionKit
VisionKit comes with new Scanning and Text Capabilities. In this tutorial, you’ll learn how to use Apple’s latest VisionKit update to take advantage of the new capabilities. By Warren Burton.
When you’re building apps, the entry barrier to some features, including text recognition, is high. Even experienced coders take a lot of time and code to get text recognition working in video.
DataScannerViewController from the powerful VisionKit is a self-contained scanner for text and barcodes that removes most of the difficulties from this task.
If you need to get text information into your app, this API might be for you. Inconveniently, DataScannerViewController is a UIViewController and isn’t directly exposed to SwiftUI. That’s OK because UIKit is not going away soon and it’s easy to combine UIKit and SwiftUI.
In this tutorial, you’ll learn how to use and customize DataScannerViewController in a UIKit based app while mixing in SwiftUI components.
To do this tutorial, you need:
- Xcode 14.0.1 or higher.
- An iPhone or iPad running iOS 16 with an A12 Bionic processor or better (Late 2017 forward).
- Basic SwiftUI knowledge.
Getting Started
Slurpy is an app that uses DataScannerViewController to capture text and barcodes and store them for future use. For example, a student visiting a museum could use Slurpy to capture text from exhibit information cards for later use.
Download the project using the Download Materials link at the top or bottom of the tutorial. Open Starter, and then open Slurpy.xcodeproj.
You’ll build to your device for this tutorial. Connect the device to your Mac and select it as the run destination. The name in the bar will be your device’s name.
![]()
Select the project file in the Project navigator:
- Select the target Slurpy.
- Switch to the Signing and Capabilities tab.
- Set your own Development Team.
- Change the Bundle ID to your specific team value.

Build and run. You’ll see a premade tabbed interface with two tabs, Ingest and Use, to keep you focused on the cool content. Next, you’ll add DataScannerViewController to your interface.

Using DataScannerViewController
In this section, you’ll create and configure the DataScannerViewController from VisionKit and add it to the interface’s Ingest tab. Soon you’ll be able to see what the camera recognizes in the view.
Creating a Delegate
Delegate protocols, or the delegation pattern, are common all through the Apple SDKs. They help you change a class behavior without needing to create a subclass.
In the Project navigator, in the group ViewControllers, open ScannerViewController.swift. You’ll see an empty class declaration for ScannerViewController.
Below the line import UIKit, add the import statement:
import VisionKit
Next, add the following code at the bottom of ScannerViewController.swift:
extension ScannerViewController: DataScannerViewControllerDelegate {
  func dataScanner(
    _ dataScanner: DataScannerViewController,
    didAdd addedItems: [RecognizedItem],
    allItems: [RecognizedItem]
  ) {
  }

  func dataScanner(
    _ dataScanner: DataScannerViewController,
    didUpdate updatedItems: [RecognizedItem],
    allItems: [RecognizedItem]
  ) {
  }

  func dataScanner(
    _ dataScanner: DataScannerViewController,
    didRemove removedItems: [RecognizedItem],
    allItems: [RecognizedItem]
  ) {
  }

  func dataScanner(
    _ dataScanner: DataScannerViewController,
    didTapOn item: RecognizedItem
  ) {
  }
}
In this extension, you conform ScannerViewController to the protocol DataScannerViewControllerDelegate. DataScannerViewControllerDelegate has methods that are called when DataScannerViewController begins recognizing or stops recognizing objects in its field of view.
You’ll come back here later once you have the scanner running. For now, this extension must exist to prevent compiler errors.
Next, you’ll extend DataScannerViewController with a function that instantiates and configures it to your needs.
Extending DataScannerViewController
In this section, you’ll make a DataScannerViewController and set it up to scan text and barcodes.
Add this extension at the bottom of ScannerViewController.swift:
extension DataScannerViewController {
  static func makeDatascanner(delegate: DataScannerViewControllerDelegate)
    -> DataScannerViewController {
    let scanner = DataScannerViewController(
      recognizedDataTypes: [
         // restrict the types here later
         .text()
      ],
      isGuidanceEnabled: true,
      isHighlightingEnabled: true
    )

    scanner.delegate = delegate
    return scanner
  }
}
In makeDatascanner, you instantiate DataScannerViewController. The first argument to init, recognizedDataTypes is an array of RecognizedDataType objects. The array is empty for now — you’ll add items you want to recognize soon.
The arguments isGuidanceEnabled and isHighlightingEnabled add extra UI to the view to help you locate objects. Finally, you make ScannerViewController the delegate of DataScannerViewController. This property assignment connects the DataScannerViewControllerDelegate methods you added before.
Adding the Scanner to the View
You’re ready to add the scanner to the view. At the top of ScannerViewController.swift, locate the class declaration for ScannerViewController and add the following inside the class body:
var datascanner: DataScannerViewController?
You’ll keep a reference to the scanner you create so you can start and stop the scanner. Next, add this method to the class body:
 func installDataScanner() {
  // 1.
  guard datascanner == nil else {
    return
  }

  // add guard here

  // 2.
  let scanner = DataScannerViewController.makeDatascanner(delegate: self)
  datascanner = scanner
  addChild(scanner)
  view.pinToInside(scanner.view)

  // 3.
  addChild(scanner)
  scanner.didMove(toParent: self)

  // 4.
  do {
    try scanner.startScanning()
  } catch {
    print("** oh no (unable to start scan) - \(error)")
  }
}
In this code you:
- Check for an existing scanner so you don’t add one twice.
- Create a scanner using
makeDatascannerthen pin the view ofDataScannerViewControllerinside thesafeAreaLayoutGuidearea ofScannerViewController.pinToInsideis an Auto Layout helper included with the starter project. - Add your
DataScannerViewControllertoScannerViewControlleras a child view controller, then tell the scanner it moved to a parent view controller. - Start the
DataScannerViewController.
Last, you’ll call installDataScanner when the view appears. Add this code inside the body of ScannerViewController:
override func viewDidAppear(_ animated: Bool) {
  super.viewDidAppear(animated)
  installDataScanner()
}
You’re ready to fire up the app! Build and run. You’ll see the app immediately crashes with a console message similar to this:
[access] This app has crashed because it attempted to access privacy-sensitive data without a usage description. The app's Info.plist must contain an NSCameraUsageDescription key with a string value explaining to the user how the app uses this data.
When an app needs to access the camera, it must explain why it should be permitted. You’ll add the necessary key next.
Adding Camera Usage Description
Now you need to change the Info.plist to get your app working.
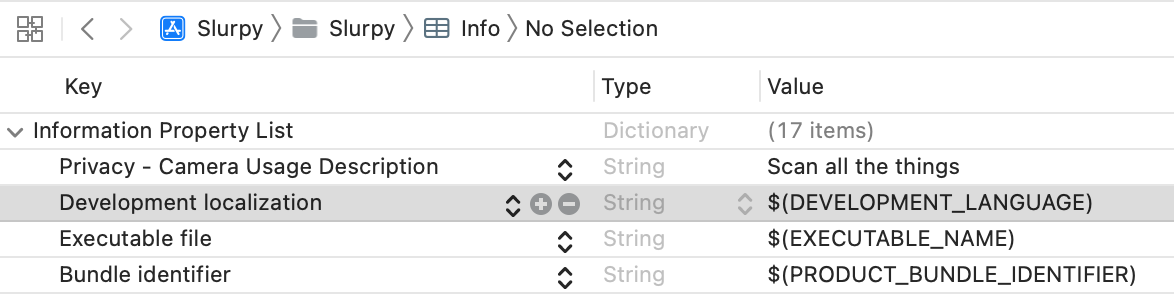
- Locate and open Info.plist in the Project navigator.
- Copy this key, NSCameraUsageDescription.
- Select the top level object Information Property List
- Click the + control that appears to add a value to the dictionary.
- In the field that appears, paste the key NSCameraUsageDescription and press Return. You’ll see the key changes to a human-readable value of Privacy — Camera Usage Description.
- Add the description Scan all the things to the Value field.
Build and run. You’ll see a permission alert appear with the text from the camera usage description you added.

Touch OK to grant permission. You now have a working camera.
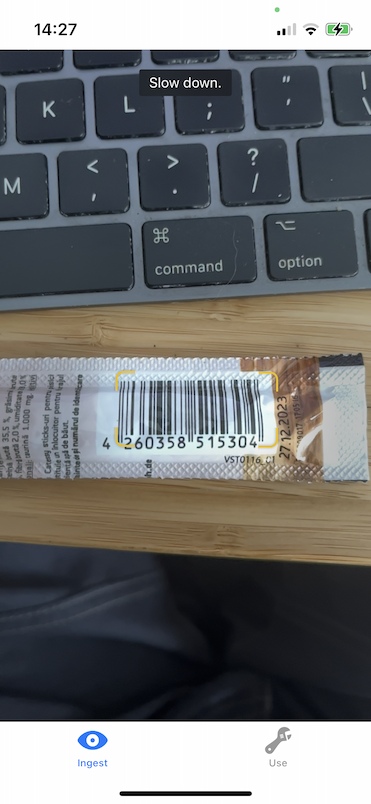
Point your camera at some text, and you’ll see a bounding rectangle. This behavior is toggled by isHighlightingEnabled, which you met earlier.
The default state for DataScannerViewController is to recognize everything it can. That’s fun, but it might not be what you want. In the next section, you’ll learn how to limit DataScannerViewController to only recognize what you need.