Advanced Charles Proxy Tutorial for iOS
Get more out of Charles Proxy by learning advanced features like mapping responses to local files, automating requests and writing logs. By Emad Ghorbaninia.
Automating Actions
Now that you know how to manipulate requests and responses with breakpoints, you may wonder if there’s a way to do this without having to open the breakpoint editing pane and race to manually change the response every time.
There is! In this section, you’ll learn how to write rules for repetitive actions.
Not only does this save time, but it also helps testers who don’t have the same access to your app. For example, say a tester wants to try your app with a specific token. In this case, they wouldn’t need to add breakpoints to all the requests. Instead, they could use the Rewrite tool to modify the token on all requests using a rule.
Using the Rewrite tool, you can create a rule to modify requests and responses as they pass through Charles.

In the Charles menu bar, click Tools ▸ Rewrite. Check Enable Rewrite, then click Add to see all three sections of the tool: sets, locations and rules.

- Sets: Shown on the left, each set can have different locations and different rules.
- Locations: Shown on the top right, each location includes a specification for a destination host.
-
Rules: Shown on the bottom right, each rule includes the actual rewrite operation, where you can manipulate the following attributes of requests and responses:
- Header
- Host
- Path
- URL
- Query Parameters
- Response Status
- Body
Next, you’ll try this out.
Rewriting Responses in Action
Remember when you mapped https://swapi.dev/api/people/ to get the response from https://www.swapi.tech/api/people/?
Imagine you’re a hacker who wants to use a man-in-the-middle server to receive all the requests and gather the data, responding to it using the same structure as the client expected but with different values. You already mapped the original server to the new one; now, it’s time to rewrite all the requests with a replacement.
In this section, you’ll rewrite that request so that instead of getting people from the swapi.tech, it gets planets.


- Remove placeholder set if any.
- In Charles, open Tools ▸ Rewrite.
- Check Enable Rewrite.
- Click Add to add a new set and name it People.
- Under Location, click Add and paste https://swapi.dev/api/people/ in the host text field for autofill of the other files. Ensure to include the final slash after people. Click OK
- In the rules section, add a new rule with a Path type. Enter people into the Value field under Match and planets in the Value field under Replace.
- Click OK to save the new rule, then click OK again to save and close the Rewrite Settings.
- In the simulator, tap Characters.
As you can see, the results aren’t the same as before. One could argue, of course, that the planets themselves are characters too.
Repeating Requests
When you test back-end code, you might want to examine the server’s response without involving your client. The Repeat tool makes this easy. Enable it by right-clicking on any request, then choosing Repeat.
In this scenario, Charles resends the exact same request to the server and shows you the response as a new request without taking any action on your client. This happens only once by default.
Keep the Repeat tool in mind when it’s difficult to navigate to the location where a request gets sent in the client interface. Once you have one example request, use Repeat to send it again.
Recording Network Activity
By logging and saving network activity to disk, you can compare results over time. This lets you see if your back-end team made any changes on your server.

This also lets you make some reports if you want to pass along any results as a tester or even as a hacker who finds security issues in a particular request.
Mirroring Network Data Locally
Using Mirror, you can save a session’s responses to disk. This comes in handy to:
- Migrate data from one server to another.
- Make a copy of all responses.
- Clone a server to use locally.
Charles places the responses in the same directory structure that the API itself uses. This means you’ll have the same path for each response with the same filename as the URL. Note that the filename includes the query strings.

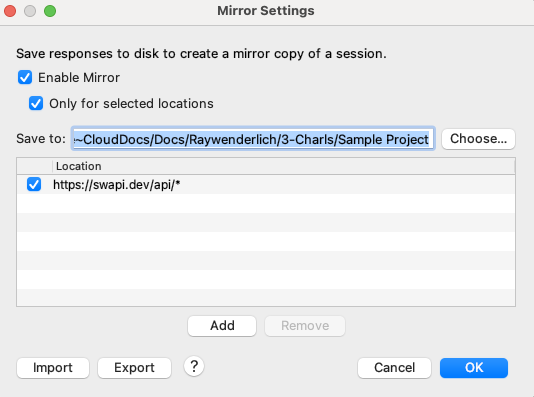
To enable mirroring, do the following:
.
- In Charles, open Tools ▸ Mirror.
- Check Enable Mirror.
- Check Only for selected locations.
- Choose a save destination.
- Add a new location by entering https://swapi.dev/api/* in the host field and click on another field for autofill. Click OK
.
Now that you set Charles to mirror all the responses from swapi.dev to your disk, return to StarCharles in the simulator and navigate around to generate some traffic.
In Finder, open the save destination.
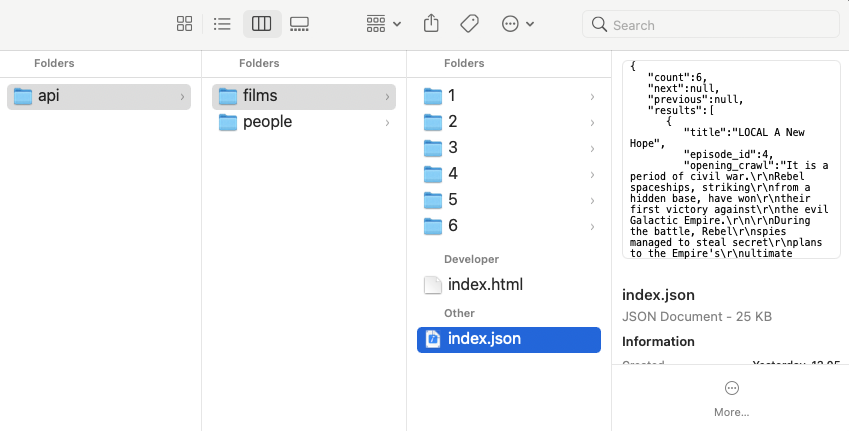
Now, you can see the saved session responses.
Automatically Saving Sessions
These days, most developers use Charles or other proxies to monitor their interactions with their servers. However, sometimes it’s really hard to find the specific request and session that caused an issue. This could be because you cleaned the Charles session view or because so many different requests pop in.
Imagine you have a tester who runs a front-end test in parallel across multiple devices with Charles setups. In this case, the tester should be able to see the result and easily make a report in case of an error. By using the Auto Save tool, the pipeline for test automation becomes more straightforward.
Using this tool, Charles automatically saves and clears the recording sessions for any period.
To enable this, follow the steps below:
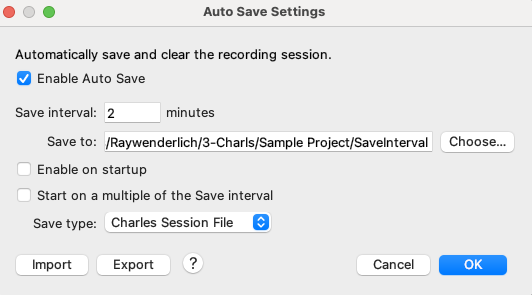
- In Charles, open Tools ▸ Auto Save.
- Check Enable Auto Save.
- Enter a 2 for save interval. This tell Charles to save every two minutes.
- Choose a destination to save the data.
- For this tutorial, leave the Save type as Charles Session File. Check out all the other choices, though, to see what makes sense for your use case.
Charles saves session files that have a timestamp in their name in the format yyyyMMddHHmm, so they appear chronologically where you chose the sessions.
Navigate around in StarCharles. Wait for a couple of minutes, you’ll see a saved session in your save destination.

You can make a report using these files and share it with anyone. They can open the file in Charles and see precisely the same session as you produced here.