Advanced Charles Proxy Tutorial for iOS
Get more out of Charles Proxy by learning advanced features like mapping responses to local files, automating requests and writing logs. By Emad Ghorbaninia.
Manipulating Data
Charles offers a variety of tools for working with request and response data, including:
- Map Local
- Map Remote
- Rewrite
- Mirror
- Auto Save
- Repeat
- Advanced Repeat
Mapping Requests to Local and Remote Responses
In Charles, mapping lets you change a request so its response is transparently served from the new location as if it were the original response. In fact, the data actually arrives from other places, like another host or even a local file.
This means you can mock your responses and manipulate the data however you like, then see how your app handles the changes. For example, how would your app behave if a variable’s type changed from Int to String? What if a value is unexpectedly nil? You can test those issues easily.
The Map Local tool maps a single request to get the response from your local machine instead of the usual endpoint. Next, you’ll try it out in StarCharles.
Inside the downloaded project materials, you’ll find a resources folder that contains films.json. Use the following steps to map https://swapi.dev/api/films/ to films.json:


- In the StarCharles app on the simulator, tap Films.
- In Charles, right-click
https://swapi.dev/api/films/and select Map Local. - Click Choose. Select the destination of films.json from the downloaded materials. Click OK.
- Open the simulator. Navigate back from the current screen. Tap Films.
You just mapped a single request to get your customized local response. In the result, you have the same data model but with different values.
From this point, you can manipulate films.json to contain whatever values you want. Be careful with the data model, however, to avoid introducing errors into the app.
Map Remote Tool
As avid fans of SWAPI already know, no one maintains the original swapi.co. Fortunately, however, copies of SWAPI live on elsewhere in the galaxy. In this section, you will use the Map Remote tool to map between the copy StarCharles uses, swapi.dev, and a different copy, swapi.tech.
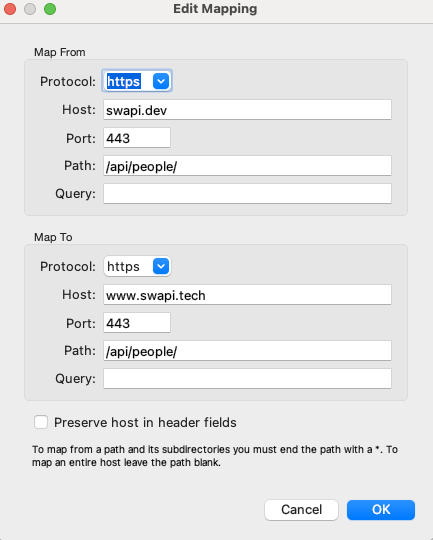
Use the following steps to map the https://swapi.dev/api/people/ request to get its response from https://www.swapi.tech/api/people/ instead:

- Tap Characters in StarCharles to generate
https://swapi.dev/api/people/. - Right-click the request in Charles and select Map Remote. Leave the Map From section as is, then fill in the lower Map To section like this:
- Choose https as the Protocol.
- Fill in www.swapi.tech as the Host.
- Enter 443 in the Port.
- Enter /api/people/ as the Path.
- Click OK to save the mapping.
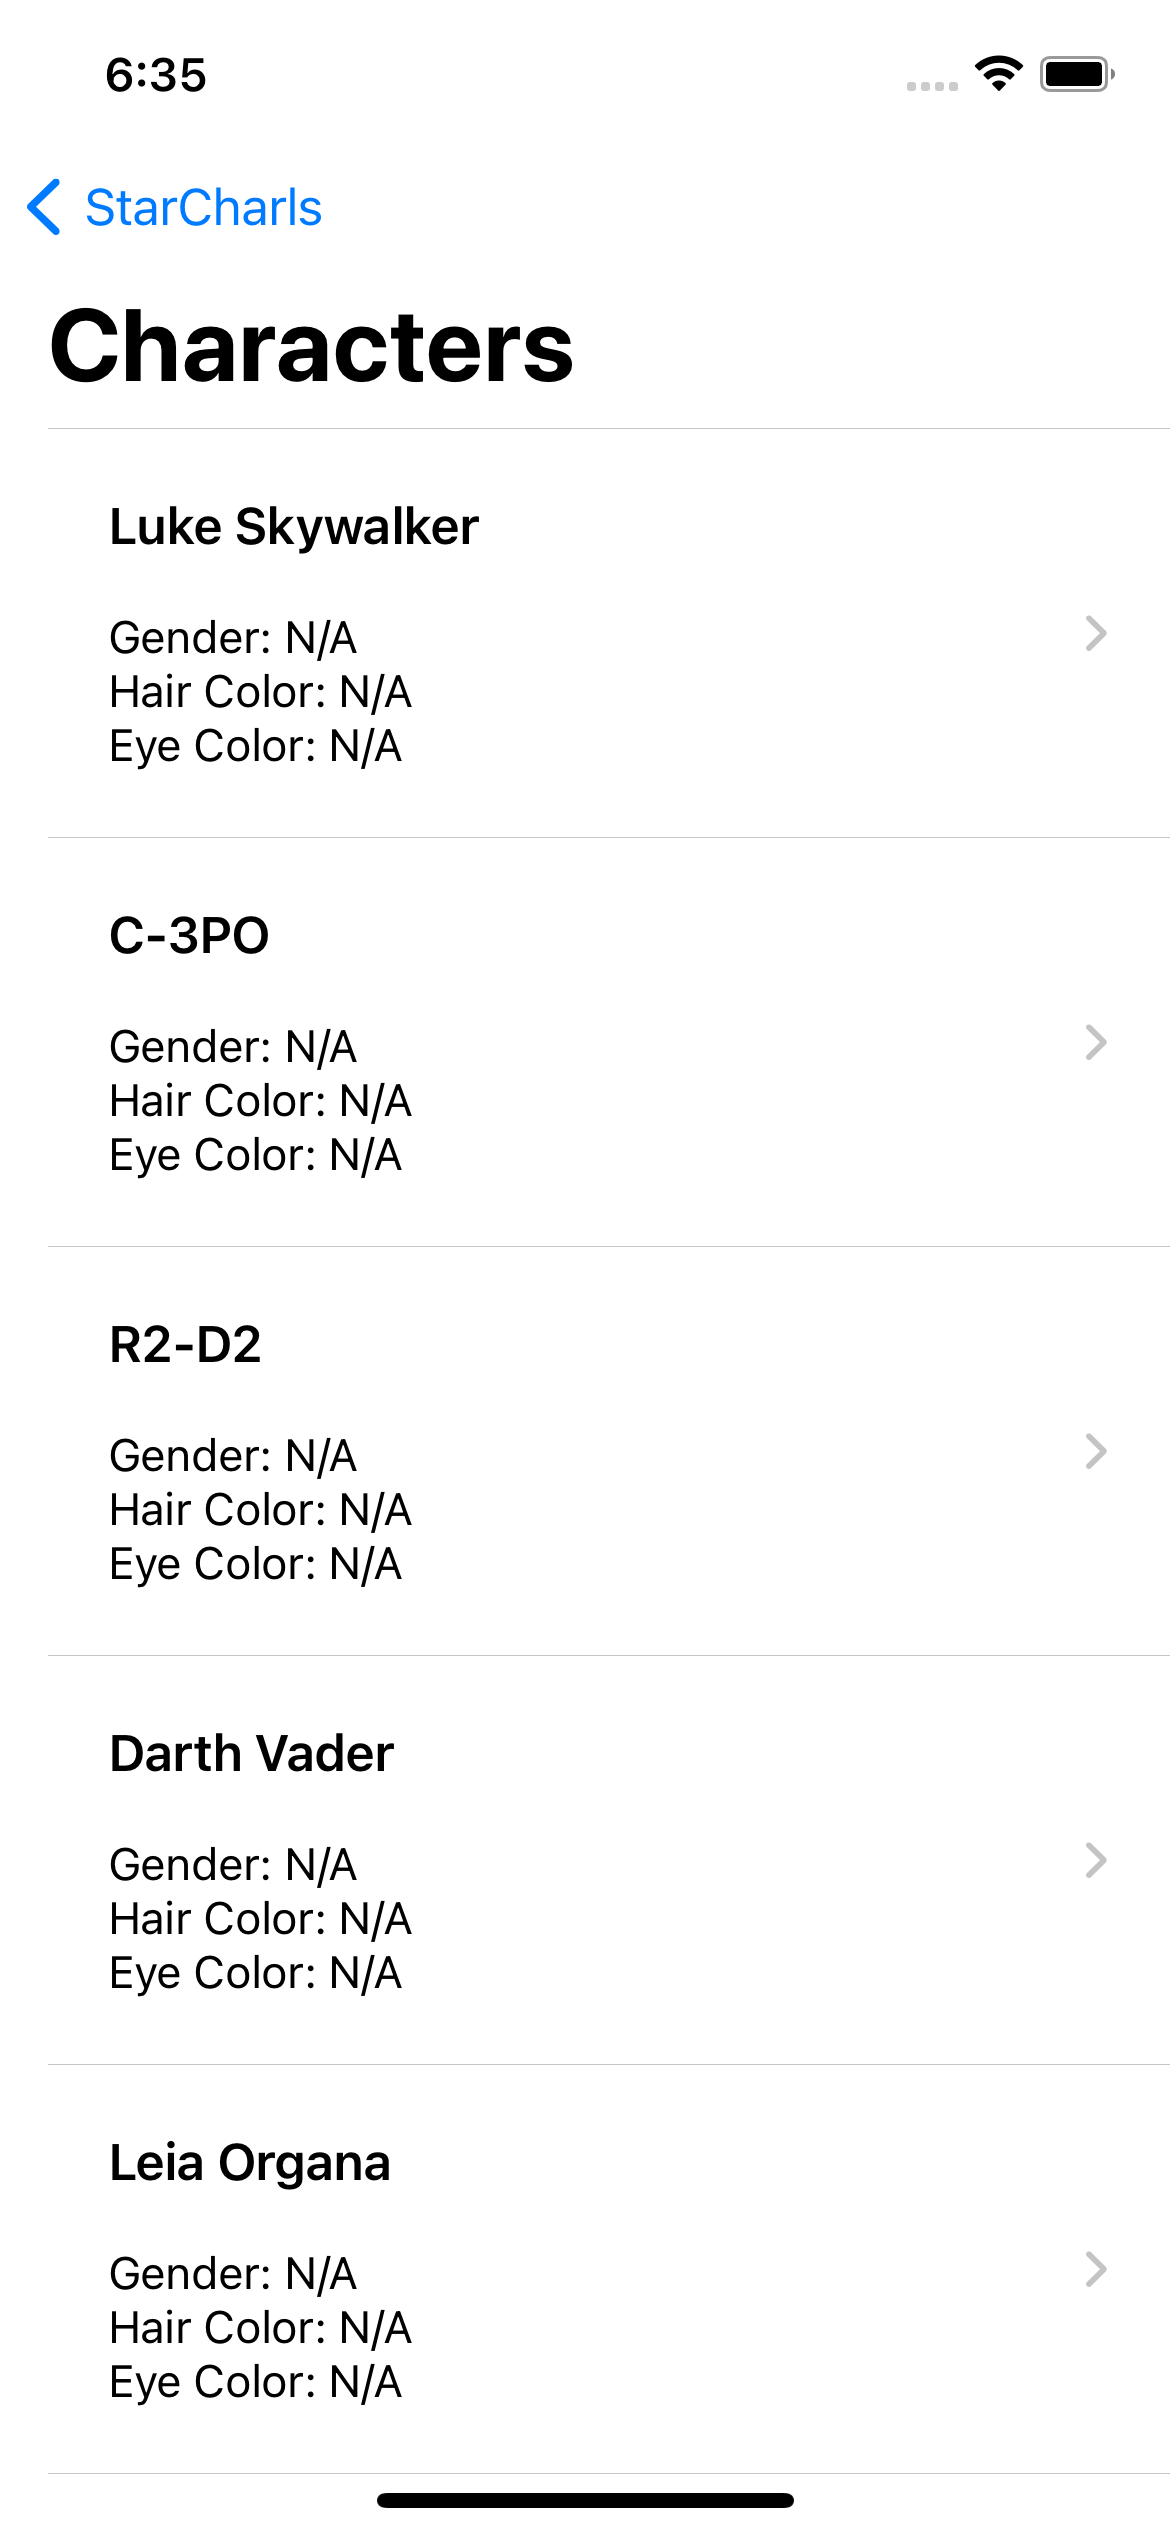
- Head back to the simulator, tap StarCharles to go back to the top level of the app, then tap Characters. Oh no! How will we ever know what Luke looks like?
- Choose https as the Protocol.
- Fill in www.swapi.tech as the Host.
- Enter 443 in the Port.
- Enter /api/people/ as the Path.
- Click OK to save the mapping.
As you can see in Charles, the request now goes to a new host. Because the new host uses a slightly different data model, the response now only contains character names.

View All Mappings
To see a list of mapped requests, follow these steps:


- Open the Tools menu.
- Click Map Local to see the requests mapped to locations on your computer.
- Or, click Map Remote to see requests mapped to different hosts.
You can double-click any mapping to edit it or use the buttons shown to add new mappings, reorder the list of mappings, import mappings from elsewhere or export your current mappings.
Using Breakpoints
Trying to fix a back-end issue? By using breakpoints and manipulating the data on the air, you can simulate any states that might come from your back-end server.
In this section, you’ll try this out by adding a breakpoint on https://swapi.dev/api/people/1 and its corresponding responses. Before you start, turn off the remote mapping you set up in the previous section by going to Tools ▸ Map Remote and unchecking Enable Map Remote. Leave the local mapping in place; you’ll use it here.
Follow these steps to add a breakpoint on the https://swapi.dev/api/people/1 request and its corresponding responses.
- Open Films in StarCharles.
- Tap LOCAL A New Hope.
-
Right-click the request
https://swapi.dev/api/people/1in Charles and select Breakpoints. - Return to the simulator and open LOCAL A New Hope again.
- Now, you can change the request’s field with any input before it arrives in the back end.
- Click Execute. The first time is for sending the request.
- Click Execute. The second time for the request response.

When you do this, you put a breakpoint on a specific API call. Then, you can catch that call before making that request to the actual server and you can manipulate the sent request. You can also change the exact response that came from the back end before it arrives at the client — in this case, StarCharles.
To stop catching the requests with breakpoints, go to Proxy ▸ Disable Breakpoints.

To see the list of all the requests with a breakpoint, open Proxy ▸ Breakpoint Settings.

Filtering Requests with Allow and Block Lists
Earlier in this tutorial, you learned how to focus on a specific host. Now, you’ll learn how to make a list to allow or block requests. This comes in handy if you want to simulate a server error or a connection lost situation.
Follow these steps to add https://swapi.dev/api/people/2 to the block list:
- Open Films in StarCharles.
- Tap LOCAL A New Hope.
-
Right-click
https://swapi.dev/api/people/2in Charles and select Block List. - Return to the simulator and open LOCAL A New Hope again.

By doing this, you put that request on the block list. Charles will fail it all the time and you’ll see the following error in the Xcode console:
Fetch character completed: failure(StarCharles.NetworkError.jsonDecodingError(error: Foundation.URLError(_nsError: Error Domain=NSURLErrorDomain Code=-1 "(null)")))
You can disable the block by right-clicking on this request again in Charles, then unchecking Block List in the drop-down menu.
You can see the list of all the requests you added to either an allow or block list by selecting Tools ▸ Allow List or Tools ▸ Block List. You can also modify that list here.
