Introduction to Unity UI – Part 1
UI is a crucial part of any video game. Even in the most basic of games you need to navigate a main menu to start the action! In this tutorial, you’ll learn about the most common components developers use to build user interfaces in Unity. All while listening to some sweet sliding blues music. :] By Ben MacKinnon.
A user interfaces is a crucial part of any video game. While you may think of video games as interactive stories full of gameplay and adventure, technically they’re just like any other software package. All games require inputs from the user — even the most basic games ask the user to at least navigate a main menu to start the game.
One of Unity’s strengths is its ability to publish multiplatform with little-to-no changes between platforms. But for that, you need to have a UI that’s capable of adapting to different screens without becoming a burden to the user.
In this tutorial, you’ll learn about the most common components developers use to build user interfaces in Unity. You’ll also learn about the canvas system and how to anchor your UI to adapt to different screen layouts. And you’ll do it all while listening to some sweet sliding blues music. :]
Getting Started
Download the starter project by clicking the Download Materials button at the top or bottom of the tutorial.
Open the starter project in the latest Unity 2021 LTS version. You can use the Unity Hub to download and install the latest version.
Once you’re set up, open the starter project in Unity and open the JukeboxHero scene in the Assets / Scenes folder. Press Play, and you’ll see a quaint bar scene with a jukebox playing in the corner. Your task is to set up some UI to let the player come in and change what’s playing.

A basic understanding of the Unity editor is all you need to get started in this tutorial. No scripting knowledge is required here, but you’ll use Unity Events to interact with the code. If you’re new to Unity, check out the Introduction to Unity tutorial.
Introducing the Unity Canvas
Just like any artist’s workflow, painting a user interface starts with a canvas. In Unity, the Canvas component controls where and how the UI is drawn to the screen. The main way it does this is through its Render Mode options.
To create a Canvas component in the scene, right-click in the hierarchy and select UI ▸ Canvas. Or, go to the top menu and select GameObject ▸ UI ▸ Canvas. Name your canvas WorldCanvas.

Next, select your new WorldCanvas and take a look at it in the Inspector window. You’ll see that the new object comes with a set of components.
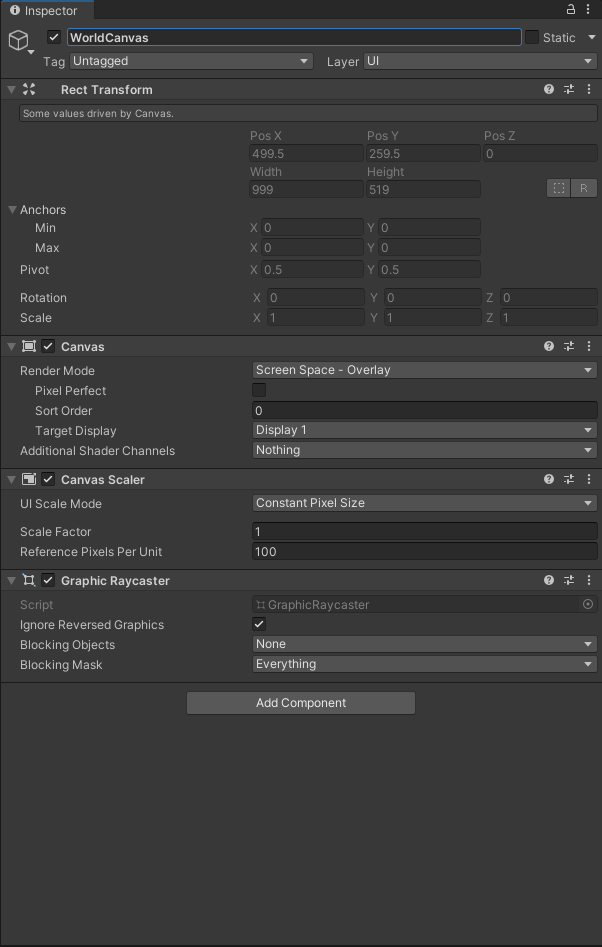
- RectTransform: All GameObjects in Unity have a Transform component, but for UI objects this is replaced with a RectTransform that gives you more control over how to position it in relation to the canvas or any other parent object. By the end of this tutorial, you’ll be very familiar with this component.
- Canvas: This component is the main behavior you’re about to explore.
- Canvas Scaler: This component helps your UI adapt its scale to fit the target screen.
- Graphic Raycaster: Without this, none of your buttons will work with the input system.
Using Render Modes
You’ll focus first on the Canvas component. You can see here it has a few different settings, but the one of most interest is the Render Mode. By default this will be set to Screen Space – Overlay, but there’s also Screen Space – Camera and World Space.


-
Screen Space – Overlay: This is the most common setting for the canvas. It means that the UI is drawn to the screen on top of everything else you have to render. If the screen is resized or changes resolution, your UI will change to match it.
-
Screen Space – Camera: Similarly, Screen Space – Camera will adapt to changes in screen size or resolution — but it will also adapt to the view frustum of the camera that’s set in the Render Camera field. This canvas mode can be used to render 2D menus that appear like they’re 3D, perhaps at an angle to the screen.
-
World Space: The final canvas mode allows you to place your 2D UI into the 3D world space. This is how you would set up indicators over a character’s head in a VR game, for example. Your UI is still just on a 2D plane, though, so you need to consider how the player will view it in the world. Does it need to rotate (billboard) to the user at all times? Or do they need to walk up to it from a certain direction to interact with it?
Understanding the Canvas Scaler
As you may have noticed in the screenshots above, the RectTransform component is grayed out when the canvas is set to either of the screen space render modes. That’s because a combination of the actual device screen, the camera frustum in Screen Space – Camera mode, and the Canvas Scaler control the size of the canvas.
The canvas scaler has three different modes to control how your UI is scaled to fit the screen.
![]()


-
Constant Pixel Size: In this mode, parts of the UI retain the pixel size, no matter the resolution of the screen the game is running on. This mode can be useful if you’d like the player to have control over how large the UI appears in the game, as adjusting the Scale Factor in the canvas scaler can scale the UI up or down.

-
Scale with Screen Size: This is the mode to use when you want your UI to adapt to different screen layouts from a single design. In this mode, you provide a Reference Resolution before setting a Screen Match Mode to determine how your UI will adapt to different screens.
- Reference Resolution: set this to the resolution your design was made for. For example, 1920 x 1080 for a PC game.
-
Screen Match Mode – How the UI should adapt if the device screen aspect ratio doesn’t match the reference resolution.
- Match Width or Height: This mode gives a slider to set whether the UI should maintain its width, height or somewhere in between.
- Expand: Expands the canvas area in either width or height so the size of the canvas is never smaller than the reference.
-
Shrink: Crops the canvas in either direction so the size of the canvas is never larger than the reference.
Note: Expand and Shrink are similar to how your television has different modes, and how it presents a cinema-format film on a 16:9 screen.
-
Constant Physical Size: Use this mode to keep your UI elements at the same physical size, no matter the resolution of the screen. This can be great for on-screen controls such as those in the PlayStation Remote Play app. However, the mode relies on the device reporting its DPI (or a fallback default) to correctly work out the size. In this mode you can choose different types of Units to control the size including centimeters, inches and points.
Note: For more tips on building your UI for different resolutions, check out the Unity documentation.
Now that you know all about the canvas and its different modes, it’s time to put this knowledge to practice! It’s time to become a jukebox hero. :]