How to Make a Game Like Wordle in SwiftUI: Part Two
Extend your Wordle word-game clone with animation, accessibility, statistics and shareable results, all in SwiftUI. By Bill Morefield.
Creating a Shake Animation
You’ll now add a shake animation to draw the player’s attention when they’ve entered an invalid word. Open CurrentGuessView.swift and add the following new property to the view:
@State var shakeOffset = 0.0
This creates a state property called shakeOffset with an initial value of 0.0.
Now, after the padding modifier on the HStack add:
// 1
.offset(x: shakeOffset)
// 2
.onChange(of: guess.status) { newValue in
  // 3
  if newValue == .invalidWord {
    withAnimation(.linear(duration: 0.1).repeatCount(3)) {
      shakeOffset = -15.0
    }
    // 4
    DispatchQueue.main.asyncAfter(deadline: .now() + 0.3) {
      withAnimation(.linear(duration: 0.1).repeatCount(3)) {
        shakeOffset = 0.0
        // 5
        DispatchQueue.main.asyncAfter(deadline: .now() + 1.0) {
          guess.status = .pending
        }
      }
    }
  }
}
SwiftUI doesn’t provide a shaking animation, so you’re creating a simple one:
- You apply an offset to the view using the
shakeOffsetstate property which is initially zero. - You tell SwiftUI to monitor for changes to the
statusproperty for this guess and then call the closure, passing the new state asnewValue. - When the new value is
invalidWord, you use thewithAnimationfunction telling SwiftUI to animate this change. You specify another linear animation with a duration of 0.1 seconds that repeats three times. The state change sets theshakeOffsetto -15, which will shift the view to the left by 15 points and back three times. - You pause for 0.3 seconds, the combined length of the animations in step three, and set the offset back to zero while applying the same animation. The combined result is the view shakes six times and ends where it began.
- You set the status of the guess back to pending after one additional second.
Build and run the app and enter an invalid word to see the animation.
Good work! Now it’s time to improve the app’s accessibility.
Improving Accessibility
Using SwiftUI provides accessibility support for most controls. Here, the view showing the guessed letter is an exception since you’re conveying information both through the text and with color, which not everyone can see. To fix this, you’ll use accessibility view modifiers. Open CurrentGuessView.swift and add the following to GuessBoxView:
.accessibilityLabel(
  letter.status ==
    .unknown ? letter.letter : "\(letter.letter) \(letter.status.rawValue)"
)
When the status of the guessed letter changes from unknown, you append the string provided in the rawValue of the status to the label. This change provides the player with both pieces of information while playing.
The colors added to the keyboard show the same problem. Go to KeyboardView.swift and add the following to the KeyButtonView before the background(_:ignoresSafeAreaEdges:) modifier:
.accessibilityLabel(
  game.statusForLetter(letter: key) == .unknown ?
  key : "\(key) \(game.statusForLetter(letter: key).rawValue)"
)
This code achieves the same goal — providing the player with additional feedback on the keys when the status changes from unknown.
Sharing Game Results
A vital part of Wordle’s success came from the ease of sharing game results. In the next section, you’ll add the ability to share victories or defeats.
To start, add a property to the GuessingGame class that holds a text representation of a finished game.
Open GuessingGame.swift and add the following computed property to the end of the class.
var shareResultText: String? {
  // 1
  guard status == .won || status == .lost else { return nil }

  // 2
  let yellowBox = "\u{1F7E8}"
  let greenBox = "\u{1F7E9}"
  let grayBox = "\u{2B1B}"

  // 3
  var text = "Guess The Word\n"
  if status == .won {
    text += "Turn \(currentGuess + 1)/\(maxGuesses)\n"
  } else {
    text += "Turn X/\(maxGuesses)\n"
  }
  // 4
  var statusString = ""
  for guess in guesses {
    // 5
    var nextStatus = ""
    for guessedLetter in guess.word {
      switch guessedLetter.status {
      case .inPosition:
        nextStatus += greenBox
      case .notInPosition:
        nextStatus += yellowBox
      default:
        nextStatus += grayBox
      }
      nextStatus += " "
    }
    // 6
    statusString += nextStatus + "\n"
  }

  // 7
  return text + statusString
}
This property returns a nullable String that describes the result of the game:
- You first ensure the game has been
wonorlostand returnnilif neither is true. - These constants contain the Unicode characters for the yellow, green and gray squares used to build the line-by-line results of the game.
- You create a variable with the name of the app and append either the turn when the player won or an X if the player didn’t win the game within the maximum number of guesses.
- You create an empty string variable named
statusStringand then loop through all guesses. - For each guess, you loop through the letters in the guess and add the appropriate color Unicode character from step two to match the status of the guess. You then append a space to separate each square from its neighbors.
- After each guess, you append the text for the guess to
statusStringfollowed by a newline so each guess appears on its own line. - Finally, you combine the strings generated in the first three steps and the last three steps as the game result.
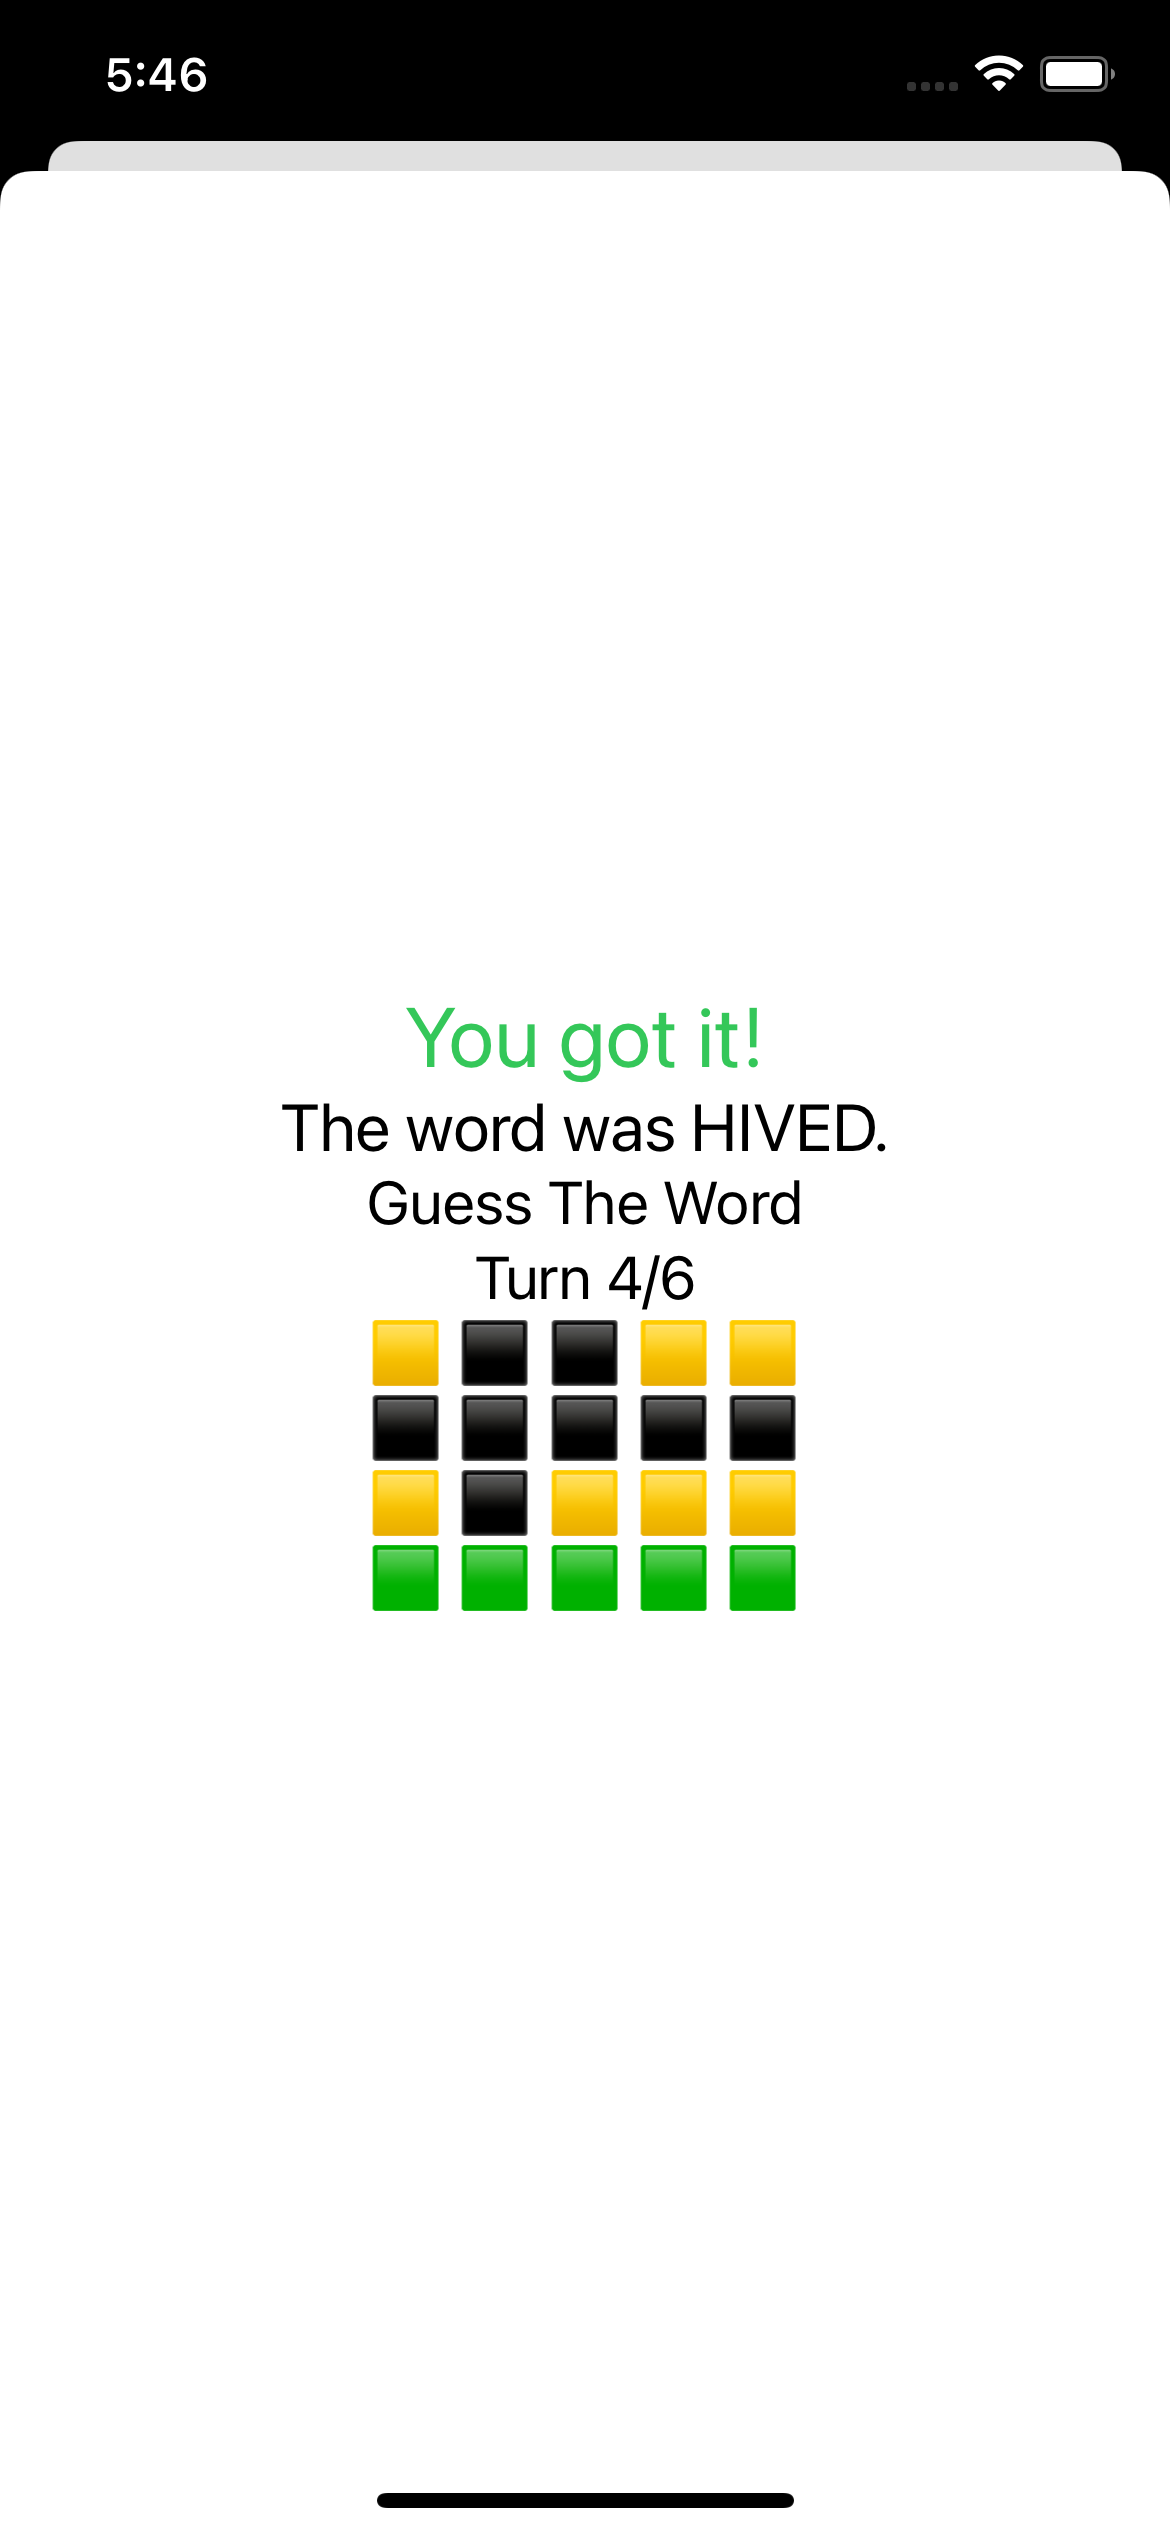
To see what this looks like, open ShowResultView.swift in the ResultsViews group. Replace the body of the view with:
Group {
  if let text = game.shareResultText {
    Text(text)
  } else {
    Text("Game Not Complete")
  }
}
.font(.title3)
.multilineTextAlignment(.center)
You attempt to unwrap the game’s shareResultText property. If successful, you display the resulting text. If the unwrapping fails, you display a message that the game isn’t complete. You enclose the condition inside a Group so you can apply the same modifiers to both cases.
Now change the body of the preview to:
ShowResultView(game: GuessingGame.wonGame())
You can now see your work in the preview for the view.

Note how the view provides a clear picture of how the player fared without giving away the guessed words or the final word. You’ll next add this to the results view. Open GameResultView.swift and add the following to the end of the VStack:
ShowResultView(game: game)
Build and run the app and play through a game to see the new view in action.
Adding a Share Button
To add the ability to share results, you’ll use an ActivitySheetView, which is implemented in ActivitySheetView.swift in the ResultsViews group. This provides a wrapper around UIViewControllerRepresentable used for sharing in iOS. Open ShowResultView.swift and add the following new property to the view:
@State var showShare = false
Then add the following code after the Text(text) view inside the if let text = game.shareResultText true condition:
// 1
.frame(maxWidth: .infinity)
// 2
.overlay(alignment: .bottomTrailing) {
  Button {
    // 3
    showShare = true
  } label: {
    Image(systemName: "square.and.arrow.up")
      .font(.title2)
  }
  // 4
  .padding(.trailing, 60)
}
This code adds a button to share and sets showShare to true when it’s tapped:
- This modifier causes the
ShowResultsViewview to take the entire width of the parent view. - You then add an overlay aligning it to the bottom trailing side of the
ShowResultsViewview. - When the button is tapped, you set
showShareto true. - You apply padding to the overlay only on the trailing side to shift the button toward the results.
Now add the following code after the Group view:
.sheet(isPresented: $showShare) {
  let text = game.shareResultText ?? ""
  ActivitySheetView(activityItems: [text])
}
When showShare becomes true, you store the game result in the text variable. You then show the ActivitySheetView view and pass in the text as an array. Build and run the app, finish a game and tap the share button. In the simulator, you can share to Reminders to quickly see the result.

Yay, you can now share your triumphs through any integration supported by iOS!
In the next section, you’ll add the ability for the game to track your results.