How to Make a Game Like Wordle in SwiftUI: Part Two

Extend your Wordle word-game clone with animation, accessibility, statistics and shareable results, all in SwiftUI. By Bill Morefield.

Leave a rating/review
Download materials
Save for later
Share

In part one, you created models for the game elements and combined views based on these models into a functional Wordle clone called Guess The Word.

In part two, you’ll continue to add features and polish to the app by:

  • Displaying the player’s results.
  • Adding animation to the player’s guesses.
  • Improving accessibility with feedback on the keyboard.
  • Allowing the player to save and share their results, as well as displaying statistics.

Getting Started

You can pick up this tutorial from where you ended part one or access the starter project by clicking the Download Materials button at the top or bottom of this tutorial. Run the app, and you’ll find you can play the game and attempt to guess the word.

Wordle clone screen showing two incorrect guesses and then the correctly guessed word

While the game works, it’s a bit unspectacular. The only indication that the player won comes in the line of green boxes, and a lost game provides no feedback. In the next section, you’ll give the player better feedback on their result.

Showing the Player’s Result

Open ContentView.swift and add the following new property after the game property:

@State private var showResults = false

You’ll use this Boolean to trigger a view showing the final result when a game ends. Add the following code just before the frame(width:height:alignment:) modifier:

.sheet(isPresented: $showResults) {
  GameResultView(game: game)
}

This will show a property sheet with GameResultView(game:) when showResults becomes true. To set the property, add the following code immediately after what you just added:

// 1
.onChange(of: game.status) { newStatus in
  // 2
  if newStatus == .won || newStatus == .lost {
    // 3
    DispatchQueue.main.asyncAfter(deadline: .now() + 1.5) {
      showResults = true
    }
  }
}

Here’s how this code handles the state change:

  1. The onChange(of:perform:) method executes the code inside the closure when game.status changes. The new value will be passed into the closure as newStatus.
  2. If newStatus is either won or lost, this means the game ended so it’s time to show the results.
  3. Using DispatchQueue.main.asyncAfter(deadline:qos:flags:execute:) allows you to execute the code inside the method’s closure after a delay. Here, you wait 1.5 seconds before changing the state. This allows the player to see the result on the game board before showing the sheet.

Next, you’ll update the view the player sees when a game ends. Open GameResultView.swift in the GameBoardViews group and change the body to:

VStack {
  if game.status == .won {
    Text("You got it!")
      .font(.title)
      .foregroundColor(.green)
  } else {
    Text("Sorry you didn't get the word in \(game.maxGuesses) guesses.")
      .font(.title2)
      .foregroundColor(.red)
  }
  Text("The word was \(game.targetWord).")
    .font(.title2)
}

Also, update your preview to show both the win and loss states:

Group {
  GameResultView(
    game: GuessingGame.wonGame()
  )
  GameResultView(
    game: GuessingGame.lostGame()
  )
}

This view shows a congratulatory message if the player wins and a condolence message if they lose. Either way, the player sees the target word. Build and run the app and play a few games to see the new view in action. Remember the app shows the target word on the console when debugging.

Wordle clone screen animation showing congratulatory message upon a successful guess

Now that you have a better view telling the player their result, you’ll add some feedback to the player on the keyboard in the next section.

Colorizing the Keyboard

To set the background color of the keys to reflect the known status of letters, open GuessingGame.swift in the Models group and add the following code to the end of the class:

func statusForLetter(letter: String) -> LetterStatus {
  // 1
  if letter == "<" || letter == ">" {
    return .unknown
  }

  // 2
  let finishedGuesses = guesses.filter { $0.status == .complete }
  // 3
  let guessedLetters =
    finishedGuesses.reduce([LetterStatus]()) { partialResult, guess in
    // 4
    let guessStatuses = 
      guess.word.filter { $0.letter == letter }.map { $0.status }
    // 5
    var currentStatuses = partialResult
    currentStatuses.append(contentsOf: guessStatuses)
    return currentStatuses
  }

  // 6
  if guessedLetters.contains(.inPosition) {
    return .inPosition
  }
  if guessedLetters.contains(.notInPosition) {
    return .notInPosition
  }
  if guessedLetters.contains(.notInWord) {
    return .notInWord
  }

  return .unknown
}

This method returns a letter’s status as follows:

  1. The special keys always return unknown.
  2. You only need to check completed guesses.
  3. You use the reduce method on finishedGuesses to build an array of LetterStatus enums for the letter.
  4. The reduce method loops through the array with the current result in partialResult and the current letter from the array as guess.
  5. For each pass, you filter any GuessedLetters for the letter in question. You then map the status property of any matching GuessedLetters into an array.

  6. Since the partialResult passed to the closure is nonmutable, you create a copy and append the results from step four to it. You send this array to the next step.
  7. Now guessedLetters contains an array with the status of the letter for any guess using the letter in question. You check if the array contains a status in order of preference. For example, if in one guess, E was in the correct position and in another guess, E is not in the correct position, the method will return inPosition since you check for that first.

Next, add the following code to the end of the class:

func colorForKey(key: String) -> Color {
  let status = statusForLetter(letter: key)

  switch status {
  case .unknown:
    return Color(UIColor.systemBackground)
  case .inPosition:
    return Color.green
  case .notInPosition:
    return Color.yellow
  case .notInWord:
    return Color.gray.opacity(0.67)
  }
}

This returns a color for each status corresponding to those used in the GuessedLetter struct. Open KeyboardView.swift in the KeyboardViews group and add the following code after the KeyButtonView view:

.background(
  game.colorForKey(key: key)
)

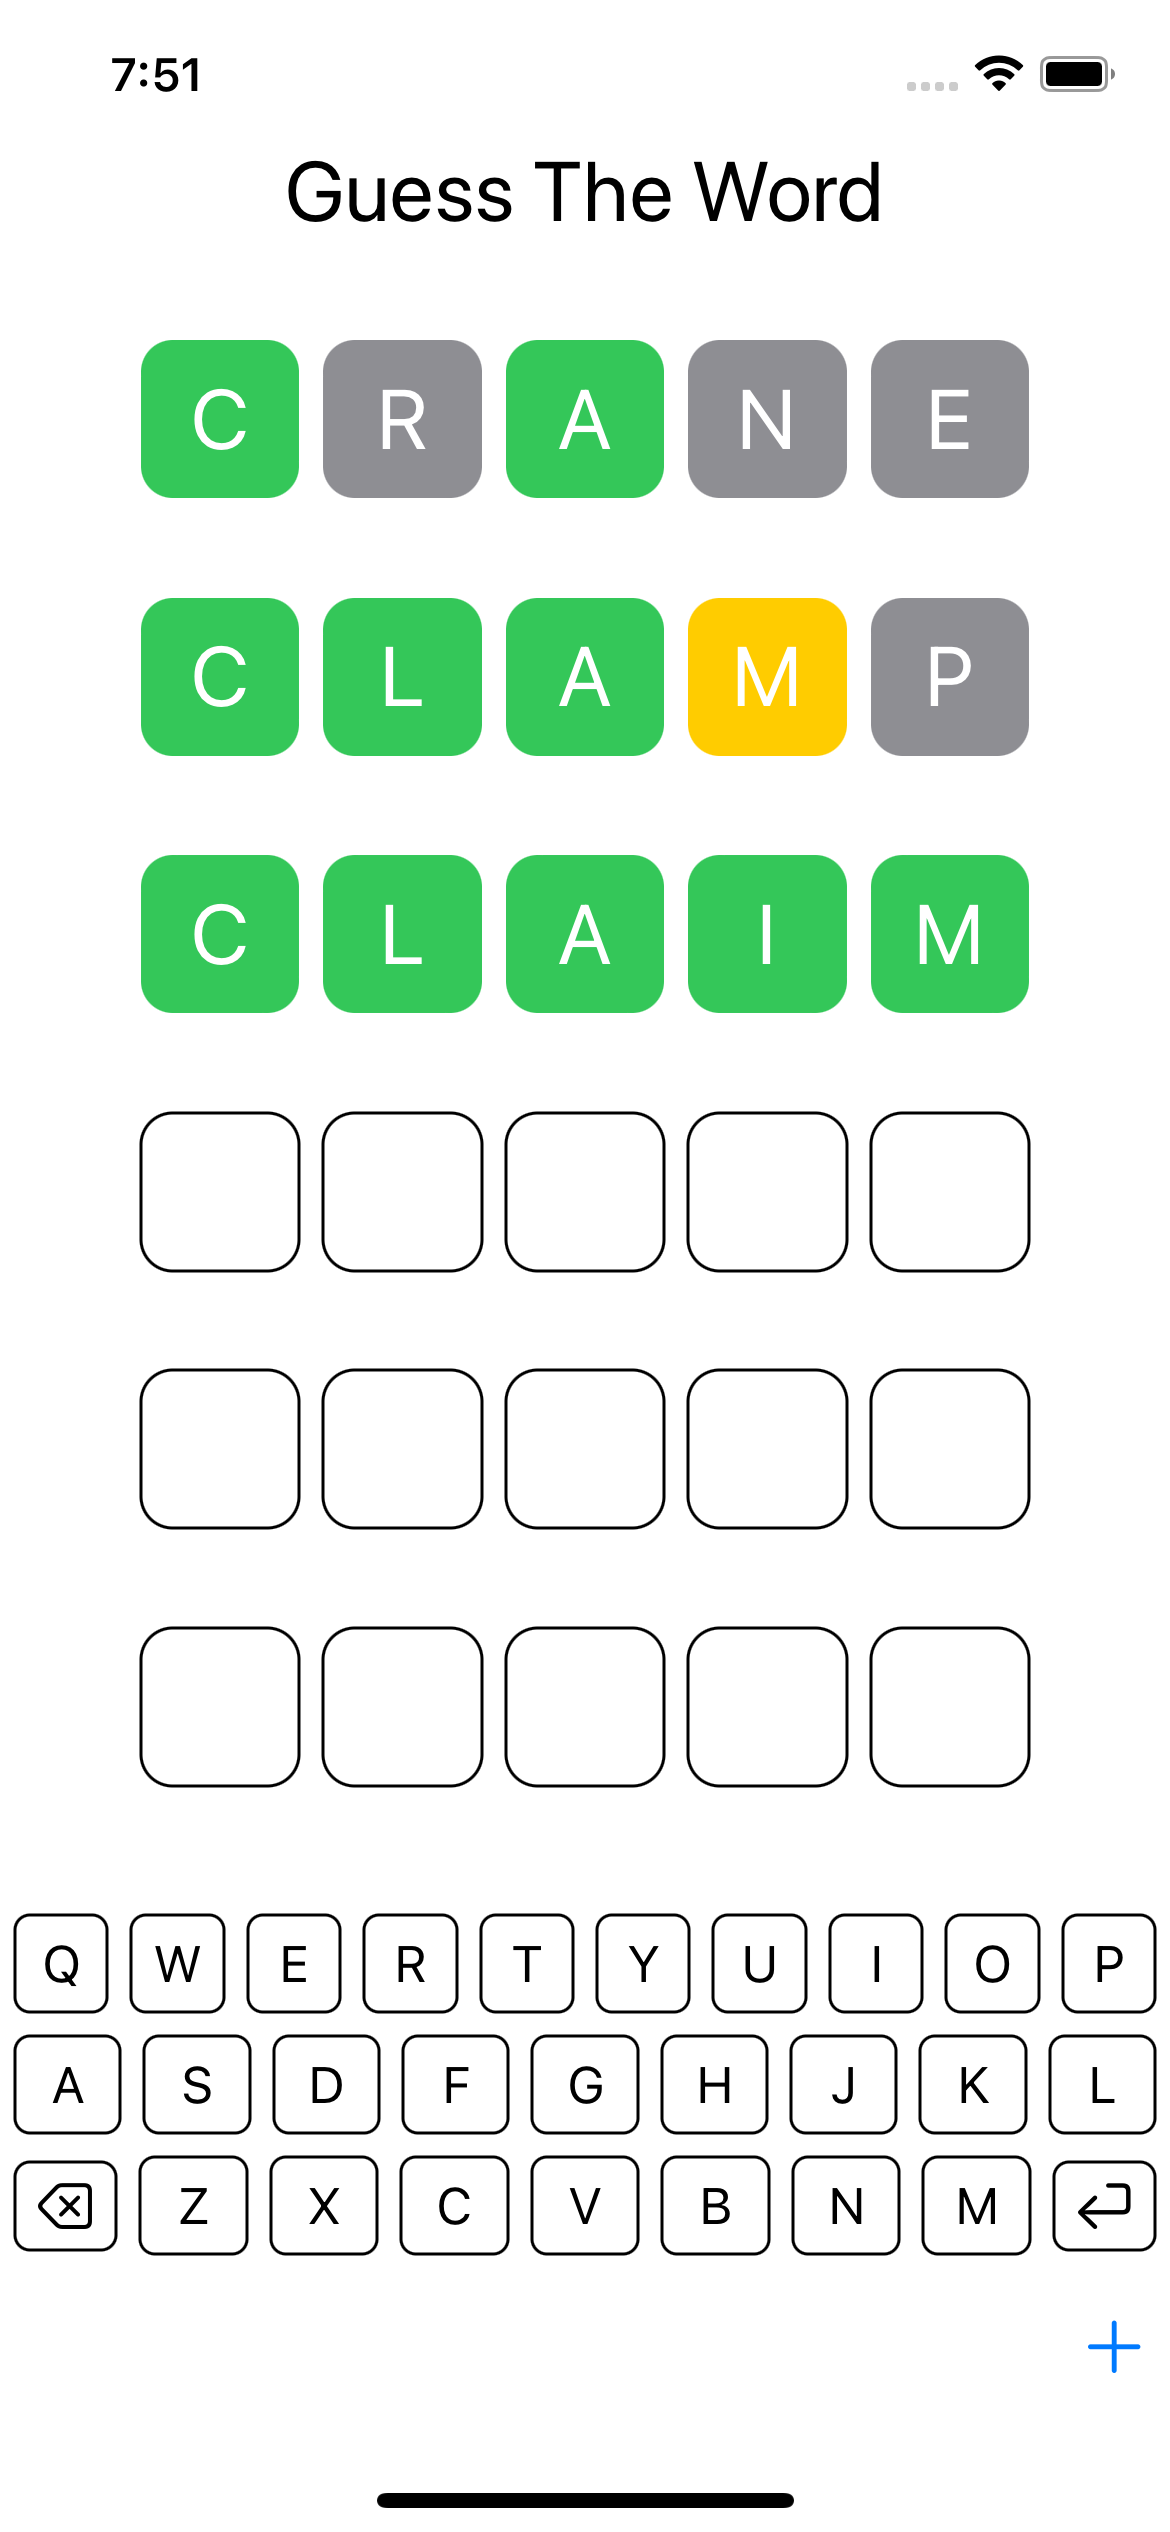
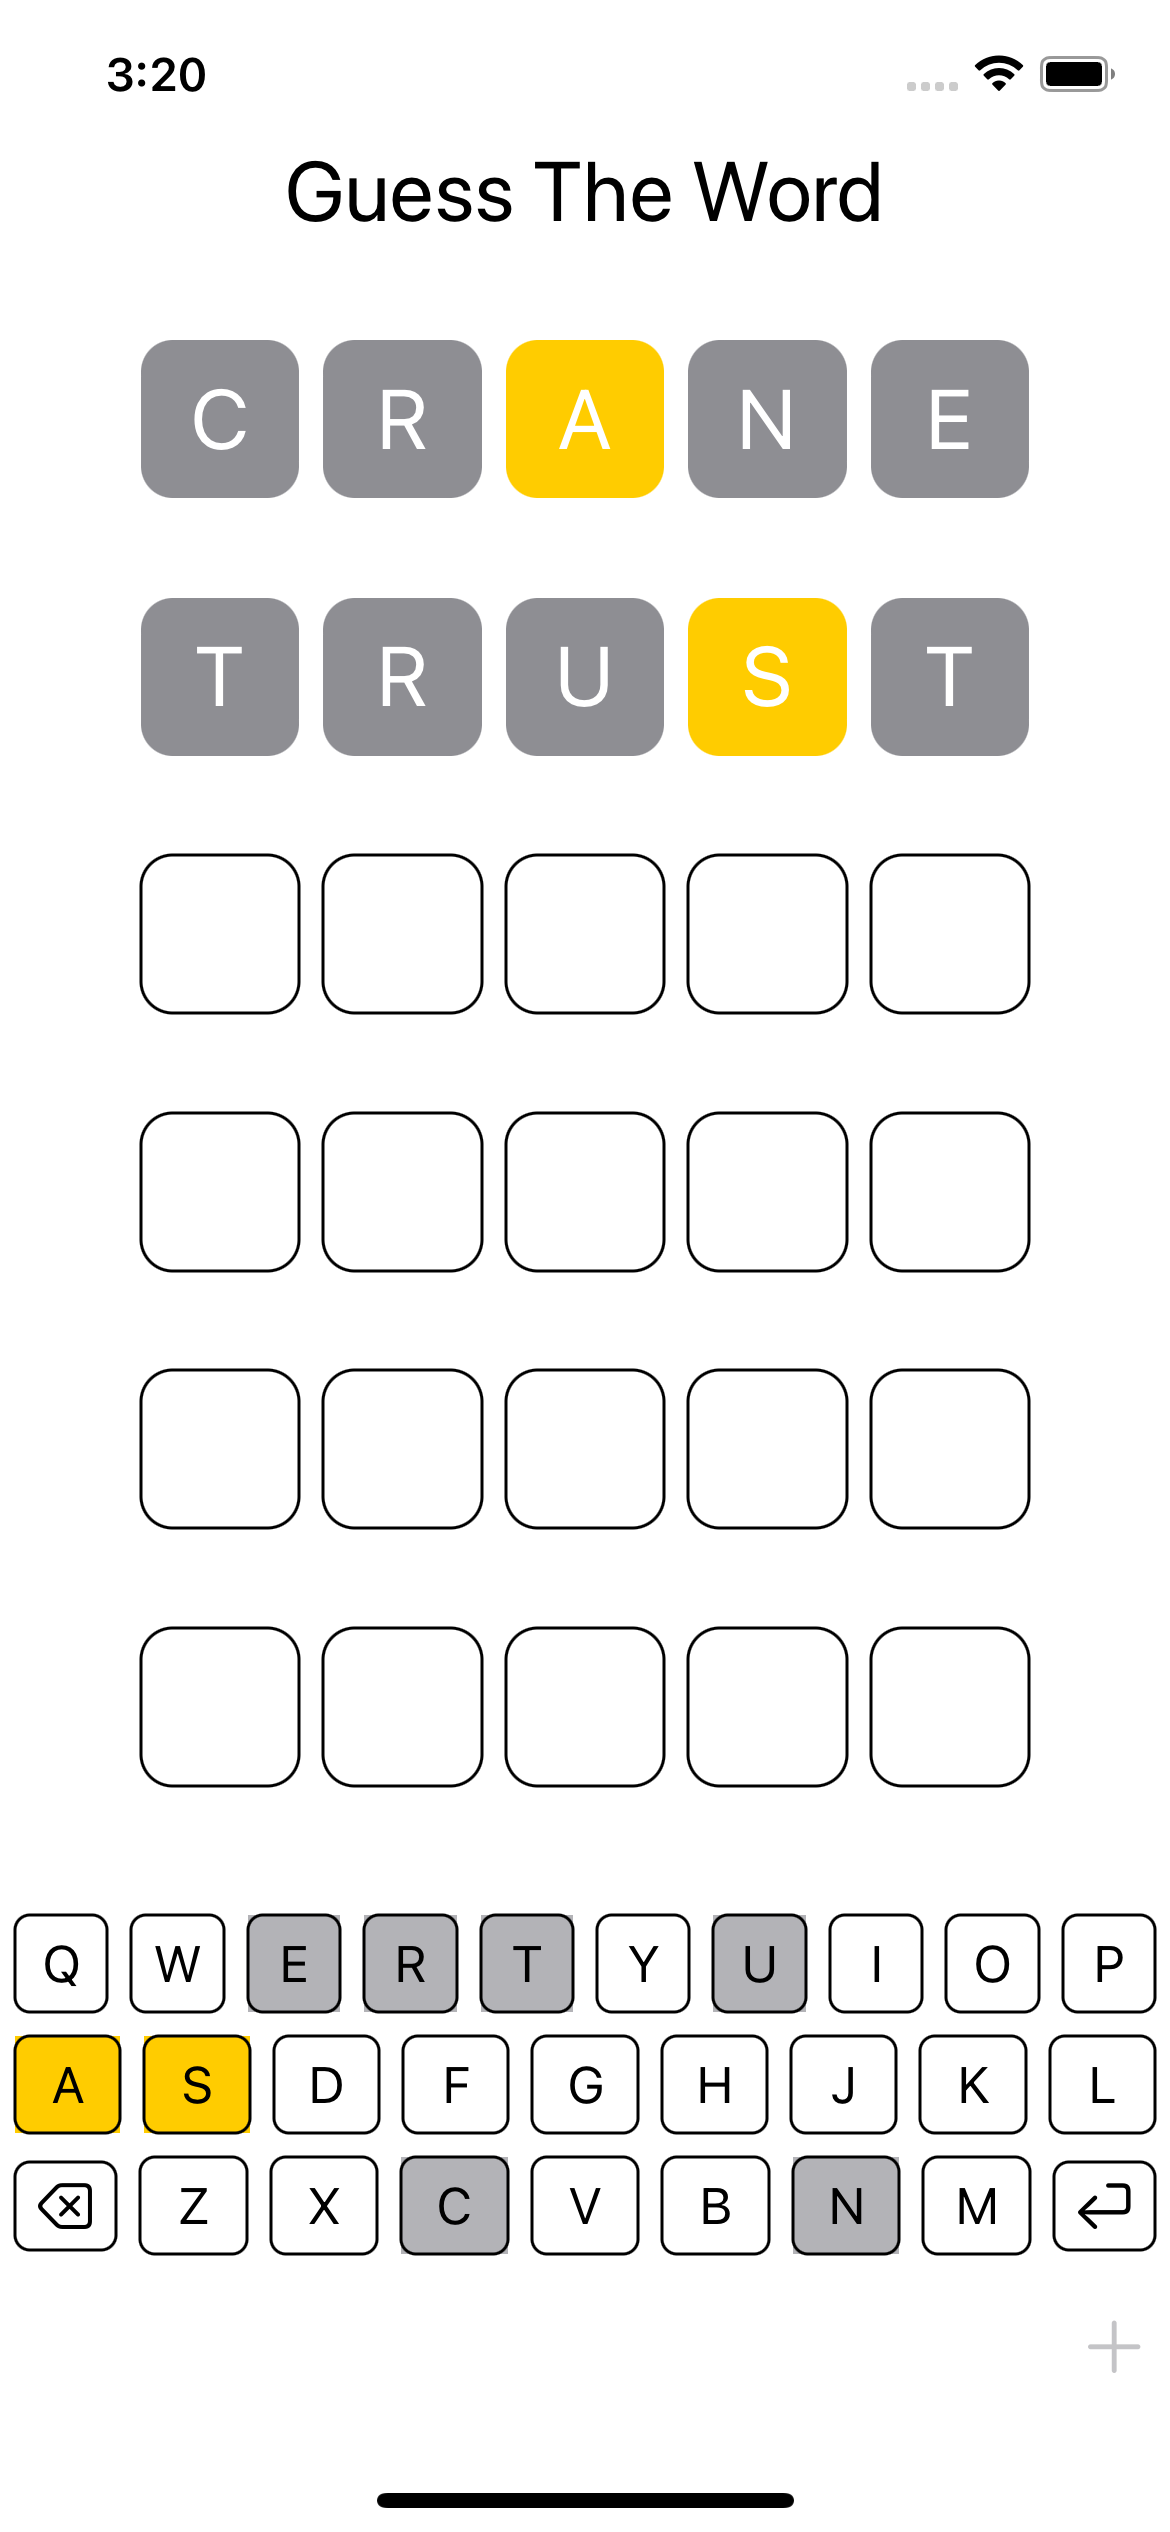
Build and run to see how your keyboard now reflects the status of each letter by color, helping the player prepare better guesses.

Wordle clone screen showing colorized keyboard to indicate letter guess status

Next, you’ll jazz things up with some animation.

Adding Animation

When the player submits a guess, the letter status changes appear instantly. An animation would help draw the player’s attention and add a little drama to the reveal. Open GuessBoxView.swift and add the following code as the last modifier after cornerRadius(_:antialiased:):

// 1
.rotation3DEffect(
  // 2
  .degrees(letter.status == .unknown ? 0 : 180),
  // 3
  axis: (x: 0.0, y: 1.0, z: 0.0)
)
// 4
.animation(
  .linear(duration: 1.0).delay(0.1 * Double(index)),
  value: letter.status
)

This code will give the guessed letters a flip animation that cascades from left to right across the view. This is what the code does:

  1. You use rotation3DEffect(_:axis:anchor:anchorZ:perspective:), a more flexible version of the more common rotationEffect(_:anchor:) modifier, letting you specify the axis of rotation.
  2. The rotation angle depends on the letter’s status. The letter will rotate 180 degrees when its status changes to something other than unknown.
  3. You specify a rotation axis using unit coordinates. This specifies the rotation should occur around the y axis running vertically down the center of the view.
  4. The animation modifier tells SwiftUI to animate any state change caused when letter.status changes. You use a linear animation that moves at constant speed between the two states and takes one second to complete. You also add a delay before the animation, which increases as index does. This delay makes the animation for the first guess occur before the second, which occurs before the third, etc.

Build and run the app, then enter a guess. Notice how the letters look backwards when the animation completes. The rotation affects the entire view, including the text. To fix the problem, add the following modifier directly after the Text view, before any other modifiers:

.rotation3DEffect(
  .degrees(letter.status == .unknown ? 0 : -180),
  axis: (x: 0.0, y: 1.0, z: 0.0)
)

This initial rotation balances the one applied later so the letters appear to flip but end up facing the correct direction. Build and run to try it out.

Wordle clone screen showing flipping letter tile animation

Creating a Shake Animation

You’ll now add a shake animation to draw the player’s attention when they’ve entered an invalid word. Open CurrentGuessView.swift and add the following new property to the view:

@State var shakeOffset = 0.0

This creates a state property called shakeOffset with an initial value of 0.0.

Now, after the padding modifier on the HStack add:

// 1
.offset(x: shakeOffset)
// 2
.onChange(of: guess.status) { newValue in
  // 3
  if newValue == .invalidWord {
    withAnimation(.linear(duration: 0.1).repeatCount(3)) {
      shakeOffset = -15.0
    }
    // 4
    DispatchQueue.main.asyncAfter(deadline: .now() + 0.3) {
      withAnimation(.linear(duration: 0.1).repeatCount(3)) {
        shakeOffset = 0.0
        // 5
        DispatchQueue.main.asyncAfter(deadline: .now() + 1.0) {
          guess.status = .pending
        }
      }
    }
  }
}

SwiftUI doesn’t provide a shaking animation, so you’re creating a simple one:

  1. You apply an offset to the view using the shakeOffset state property which is initially zero.
  2. You tell SwiftUI to monitor for changes to the status property for this guess and then call the closure, passing the new state as newValue.
  3. When the new value is invalidWord, you use the withAnimation function telling SwiftUI to animate this change. You specify another linear animation with a duration of 0.1 seconds that repeats three times. The state change sets the shakeOffset to -15, which will shift the view to the left by 15 points and back three times.
  4. You pause for 0.3 seconds, the combined length of the animations in step three, and set the offset back to zero while applying the same animation. The combined result is the view shakes six times and ends where it began.
  5. You set the status of the guess back to pending after one additional second.

Build and run the app and enter an invalid word to see the animation.

Wordle clone screen showing shake animation when guess is not in dictionary

Good work! Now it’s time to improve the app’s accessibility.

Improving Accessibility

Using SwiftUI provides accessibility support for most controls. Here, the view showing the guessed letter is an exception since you’re conveying information both through the text and with color, which not everyone can see. To fix this, you’ll use accessibility view modifiers. Open CurrentGuessView.swift and add the following to GuessBoxView:

.accessibilityLabel(
  letter.status ==
    .unknown ? letter.letter : "\(letter.letter) \(letter.status.rawValue)"
)

When the status of the guessed letter changes from unknown, you append the string provided in the rawValue of the status to the label. This change provides the player with both pieces of information while playing.

The colors added to the keyboard show the same problem. Go to KeyboardView.swift and add the following to the KeyButtonView before the background(_:ignoresSafeAreaEdges:) modifier:

.accessibilityLabel(
  game.statusForLetter(letter: key) == .unknown ?
  key : "\(key) \(game.statusForLetter(letter: key).rawValue)"
)

This code achieves the same goal — providing the player with additional feedback on the keys when the status changes from unknown.

Sharing Game Results

A vital part of Wordle’s success came from the ease of sharing game results. In the next section, you’ll add the ability to share victories or defeats.

To start, add a property to the GuessingGame class that holds a text representation of a finished game.

Open GuessingGame.swift and add the following computed property to the end of the class.

var shareResultText: String? {
  // 1
  guard status == .won || status == .lost else { return nil }

  // 2
  let yellowBox = "\u{1F7E8}"
  let greenBox = "\u{1F7E9}"
  let grayBox = "\u{2B1B}"

  // 3
  var text = "Guess The Word\n"
  if status == .won {
    text += "Turn \(currentGuess + 1)/\(maxGuesses)\n"
  } else {
    text += "Turn X/\(maxGuesses)\n"
  }
  // 4
  var statusString = ""
  for guess in guesses {
    // 5
    var nextStatus = ""
    for guessedLetter in guess.word {
      switch guessedLetter.status {
      case .inPosition:
        nextStatus += greenBox
      case .notInPosition:
        nextStatus += yellowBox
      default:
        nextStatus += grayBox
      }
      nextStatus += " "
    }
    // 6
    statusString += nextStatus + "\n"
  }

  // 7
  return text + statusString
}

This property returns a nullable String that describes the result of the game:

  1. You first ensure the game has been won or lost and return nil if neither is true.
  2. These constants contain the Unicode characters for the yellow, green and gray squares used to build the line-by-line results of the game.
  3. You create a variable with the name of the app and append either the turn when the player won or an X if the player didn’t win the game within the maximum number of guesses.
  4. You create an empty string variable named statusString and then loop through all guesses.
  5. For each guess, you loop through the letters in the guess and add the appropriate color Unicode character from step two to match the status of the guess. You then append a space to separate each square from its neighbors.
  6. After each guess, you append the text for the guess to statusString followed by a newline so each guess appears on its own line.
  7. Finally, you combine the strings generated in the first three steps and the last three steps as the game result.

To see what this looks like, open ShowResultView.swift in the ResultsViews group. Replace the body of the view with:

Group {
  if let text = game.shareResultText {
    Text(text)
  } else {
    Text("Game Not Complete")
  }
}
.font(.title3)
.multilineTextAlignment(.center)

You attempt to unwrap the game’s shareResultText property. If successful, you display the resulting text. If the unwrapping fails, you display a message that the game isn’t complete. You enclose the condition inside a Group so you can apply the same modifiers to both cases.

Now change the body of the preview to:

ShowResultView(game: GuessingGame.wonGame())

You can now see your work in the preview for the view.

Preview showing familiar colored boxes indicating correct and incorrect letters in guesses

Note how the view provides a clear picture of how the player fared without giving away the guessed words or the final word. You’ll next add this to the results view. Open GameResultView.swift and add the following to the end of the VStack:

ShowResultView(game: game)

Build and run the app and play through a game to see the new view in action.

View showing You got it success message plus colored boxes describing guesses

Adding a Share Button

To add the ability to share results, you’ll use an ActivitySheetView, which is implemented in ActivitySheetView.swift in the ResultsViews group. This provides a wrapper around UIViewControllerRepresentable used for sharing in iOS. Open ShowResultView.swift and add the following new property to the view:

@State var showShare = false

Then add the following code after the Text(text) view inside the if let text = game.shareResultText true condition:

// 1
.frame(maxWidth: .infinity)
// 2
.overlay(alignment: .bottomTrailing) {
  Button {
    // 3
    showShare = true
  } label: {
    Image(systemName: "square.and.arrow.up")
      .font(.title2)
  }
  // 4
  .padding(.trailing, 60)
}

This code adds a button to share and sets showShare to true when it’s tapped:

  1. This modifier causes the ShowResultsView view to take the entire width of the parent view.
  2. You then add an overlay aligning it to the bottom trailing side of the ShowResultsView view.
  3. When the button is tapped, you set showShare to true.
  4. You apply padding to the overlay only on the trailing side to shift the button toward the results.

Now add the following code after the Group view:

.sheet(isPresented: $showShare) {
  let text = game.shareResultText ?? ""
  ActivitySheetView(activityItems: [text])
}

When showShare becomes true, you store the game result in the text variable. You then show the ActivitySheetView view and pass in the text as an array. Build and run the app, finish a game and tap the share button. In the simulator, you can share to Reminders to quickly see the result.

Shared guesses shown in Reminders to prove that share sheet now works

Yay, you can now share your triumphs through any integration supported by iOS!

In the next section, you’ll add the ability for the game to track your results.

Saving Game Results

To track the player’s long-term trends, you need a way to save the results of previous games. You’ll only store the turn on which the player successfully guessed the word or lost.

Open GuessingGame.swift and add the following new property to the class:

@AppStorage("GameRecord") var gameRecord = ""

The @AppStorage property wrapper ties a variable to the UserDefaults, a place you can store key-value pairs consistently across launches of your app. You tie the gameRecord variable to a key named GameRecord and set it as an empty string if the key does not currently exist in UserDefaults. If the variable changes, SwiftUI will update the value in UserDefaults, and vice-versa.

Now, find the checkGuess() method in the GuessingGame class. Look for where you mark a game as won, which reads status = .won, and add the following code directly before the return:

gameRecord += "\(currentGuess + 1)"

This will add the number of the turn when the player won the game. Remember that currentGuess is a zero-based index but the first possible turn is number one. To handle this, you add one to currentGuess. Move to the next if-else statement and add the following code after status = .lost:

gameRecord += "L"

When the player loses a game, this will mark the result with an L. Over time, your app will now track the player’s game history. In the next section, you’ll use that history to show the player how they’re doing.

Displaying Statistics

The work of translating the string stored in the gameRecord in the previous section will be handled by the GameStatistics struct found in GameStatistics.swift. Open this and you’ll see it expects a string with the history you stored in the last section.

Open StatisticsView.swift in the ResultsViews group. It expects a GameStatistics struct when you show the view. You’ll use the data calculated by this struct to build a view showing the player’s game results. Replace the body of this view with:

VStack(spacing: 15.0) {
  VStack {
    Text("Game Statistics")
      .font(.title)
    Text("Played: \(stats.gamesPlayed) ") +
    Text("Won: \(stats.gamesWon) (\(stats.percentageWon) %)")
    Text("Win Streak: \(stats.currentWinStreak) ") +
    Text("Max Streak: \(stats.maxWinStreak)")
  }
  // Next VStack here
}

This will create a pair of nested VStack views, with the outer one specifying spacing between the inner ones. This section shows the number of games played, the number of games won and the winning percentage. It also shows the player their current and longest winning streaks. This data all comes from the GameStatistics property passed into the view.

Building a Bar Chart

Now replace the // Next VStack here comment with the following:

// 1
VStack(alignment: .leading) {
  Text("Winning Guess Distribution")
    .font(.title)
  
  // 2
  let maxDistribution = Double(stats.winRound.max() ?? 1)
  // 3
  ForEach(stats.winRound.indices, id: \.self) { index in
    // 4
    let barCount = stats.winRound[index]
    let barLength = barCount > 0 ?
      Double(barCount) / maxDistribution * 250.0 : 1
    HStack {
      // 5
      Text("\(index + 1):")
      Rectangle()
        .frame(
          width: barLength,
          height: 20.0
        )
      Text("\(barCount)")
    }
  }
}

This code will produce a bar chart showing the rounds where the player has won games:

  1. You set the alignment of the VStack to leading to align all views against the leading edge of the parent view.
  2. The winRound property contains an array indicating how many times the player won in the specified number of guesses. Again, remember that winning on the first guess would be at index zero. You get the greatest number in the array to scale your bar chart. If there are no entries, then you use the value 1.
  3. Now you loop through all indices of the winRound property. The current index will be passed to the closure as index.
  4. You get the number of games won with guesses corresponding to the current index. You check if this value is greater than zero. If so, you calculate the ratio between this number and the largest number in the array. You multiply that ratio by 250.0 points to get the length of the bar. If the value for this index was zero, then you use 1 to show a thin line instead of nothing.
  5. Inside an HStack you show three views. First, you show the number of guesses this bar represents (adding one to convert from a zero-based array). You next create a rectangle with the width calculated in barLength in step four and a height of 20 points. Last, you display the actual count.

To see the result, change the preview to provide a history:

StatisticsView(stats: GameStatistics(gameRecord: "4L652234L643"))

Show the preview to see the results.

Preview of new game statistics view

Now you can add this information to the game result view. Open GameResultView.swift in GameBoardViews. Since we’re adding more information, Command + Click on the ShowResultView and select Embed in VStack. If you don’t see this option, make sure you’re displaying the preview canvas alongside the editor. Change the newly created VStack to be a ScrollView. This handles cases where the additional information won’t fit on the screen of smaller devices. Finally, add the following code at the bottom of the ScrollView:

StatisticsView(
  stats: GameStatistics(gameRecord: game.gameRecord)
)

Build and run the app, then play a few games to create a history so you can appreciate the new statistics view.

View showing game guesses plus winning guess distribution

Adding a Show Stats Button

You’ll now add a button to let the player view these stats anytime. Open ActionBarView.swift. Add the following code before the Spacer() in the view:

Button {
  showStats = true
} label: {
  Image(systemName: "chart.bar")
  .imageScale(.large)
  .accessibilityLabel("Show Stats")
}

This adds a button that, when tapped, will set showStats to true.

Open ContentView.swift and add the following after the existing sheet:

.sheet(isPresented: $showStats) {
  StatisticsView(stats: GameStatistics(gameRecord: game.gameRecord))
}

This displays the statistics in a modal view when showStats is true.

Build and run the app, then tap the new button to see the stats page.

Finished game statistics view

Congratulations! You’ve now replicated the most visible features of the original Wordle. In the next section, you’ll add a few finishing touches around managing the game state.

Remembering Where the Player Is

There’s a rather annoying bug in the game right now. Run the app and make a couple of guesses.

Now force quit. When you restart the game, you’ll lose your progress. Whenever the app gets stopped or cleared from memory, the player loses their current game. To fix that, you’ll need a way to store the game’s current state and know when to load and save that state. Open GuessingGame.swift and add the new property:

@AppStorage("GameState") var gameState = ""

Again you’ll use the @AppStorage property wrapper to store information in UserDefaults. Next, add the following method to the end of the class:

func saveState() {
  let guessList = 
    guesses.map { $0.status == .complete ? "\($0.letters)>" : $0.letters }
  let guessedKeys = guessList.joined()
  gameState = "\(targetWord)|\(guessedKeys)"
  print("Saving current game state: \(gameState)")
}

This uses the map method on the guesses array. Each guess will become a string with the letters in the guess plus a > for complete guesses. You join the elements of the string array into a single string. You then store a string consisting of the targetWord, a | separator, and then the combined string that represents the current guesses. Next, you’ll add a method to bring this game state back in.

Add the following method to the end of the class:

func loadState() {
  // 1
  print("Loading game state: \(gameState)")
  currentGuess = 0
  guesses = .init()
  guesses.append(Guess())
  status = .inprogress

  // 2
  let stateParts = gameState.split(separator: "|")
  // 3
  targetWord = String(stateParts[0])
  // 4
  guard stateParts.count > 1 else { return }
  let guessList = String(stateParts[1])
  // 5
  let letters = Array(guessList)
  for letter in letters {
    let newGuess = String(letter)
    addKey(letter: newGuess)
  }
}

Loading the state is a bit more complicated but just reverses the steps:

  1. First you reset the game by setting the current guess to zero, clearing the guesses array before adding an empty guess and then setting the status to inprogress.
  2. Next, you take the gameState string and split it at the | character to get an array of two strings.
  3. You set the target word to the first string of this array.
  4. You ensure there is a second string, which might not be the case if the player began a game, but didn’t enter any letters. If there are letters, you store them in guessList.
  5. You now convert the guessList into an array of characters and then loop through each letter. You convert each letter to a String and then call addKey(letter:) with that letter. The result rebuilds the game state in the same way as if the player tapped the letters directly.

One more thing in this class; any time the game completes, you want to clear any saved state.

At the top of the class, find the declaration of the status property and replace it with:

var status: GameState = .initializing {
  didSet {
    if status == .lost || status == .won {
      gameState = ""
    }
  }
}

Whenever the status property changes, you use the didSet property observer to check if the new status is lost or won. If so, you set the gameState to an empty string since the game completed and no longer needs to be restored.

Now, you need to update the app to store and load the game when needed. Open ContentView.swift and add a new property at the top:

@Environment(\.scenePhase) var scenePhase

The scenePhase environment variable indicates a scene’s operational state. By monitoring changes, you can tell when you need to load or save the game state.

Add the following code after the existing use of onChange(of:perform:):

// 1
.onChange(of: scenePhase) { newPhase in
  // 2
  if newPhase == .active {
    if game.status == .new && !game.gameState.isEmpty {
      game.loadState()
    }
  }
  // 3
  if newPhase == .background || newPhase == .inactive {
    game.saveState()
  }
}

This code manages the state by:

  1. Monitoring changes in the scenePhase property. The new state will be passed into the closure as newPhase.
  2. If the app becomes active, you check if the status of the game is new, meaning no player action has taken place and the gameState property isn’t empty. The presence of stored state implies there’s a game to restore and is why you clear the state when a game ends. If both are true, then tell the game to load the saved state. In the case where the app hadn’t been pushed from memory, the status of the game will be inprogress so it retains the player’s current efforts.
  3. Any time the app goes into the background state, you tell the game to store its current state in case it’s needed later.

Build and run the app, start a game and then force quit. You should see the console message telling you the app saved the state. Start the app again and the game will pick up where you left off.

Animation showing player's state is now saved

Where to Go From Here?

You can use the Download Materials button at the top and bottom of this tutorial to download the starter and final projects. You’ve built a nice Wordle clone in SwiftUI and, in the process, learned about modeling the game, building an app and adding finishing touches to improve the player’s experience.

Don’t forget to read part one of this tutorial on building this app.

For more about accessibility, see the iOS Accessibility in SwiftUI Tutorial series.

For more on animation in SwiftUI, see Chapter 19 of SwiftUI by Tutorials.

We hope you enjoyed this tutorial. If you have any questions or comments, please join the forum discussion below!