Android Drag and Drop Tutorial: Moving Views and Data
Learn how to use Android’s drag-and-drop framework to enable an advanced gesture-based user experience. By Kushal Kumar R.
Customizing a Drag Shadow
When you use the default constructor, View.DragShadowBuilder(view), you’ll get a default drag shadow. The default values in a drag shadow have the same dimensions as the argument View.
The touch point is the location of the user’s finger within the drag shadow. The default touch point is at the center of the argument View.
Before you can start customizing your drag shadow, you need to import the following packages:
import android.graphics.Canvas
import android.graphics.Point
import android.view.View
import androidx.core.content.res.ResourcesCompat
Next, add MaskDragShadowBuilder by adding the following code to MainActivity.kt:
private class MaskDragShadowBuilder(view: View) : View.DragShadowBuilder(view) {

  //1
  private val shadow = ResourcesCompat.getDrawable(view.context.resources, R.drawable.ic_mask, view.context.theme)

  // 2
  override fun onProvideShadowMetrics(size: Point, touch: Point) {
    // 3
    val width: Int = view.width

    // 4
    val height: Int = view.height

    // 5
    shadow?.setBounds(0, 0, width, height)

    // 6
    size.set(width, height)

    // 7
    touch.set(width / 2, height / 2)
  }

  // 8
  override fun onDrawShadow(canvas: Canvas) {
    // 9
    shadow?.draw(canvas)
  }
}
This code creates a drag shadow that looks like the mask the user will drag. Here’s how it works:
- Sets the drag shadow appearance to match the actual mask. The drag shadow here is of a
Drawabletype. - Invokes
onProvideShadowMetrics()when you triggerstartDragAndDrop()orstartDrag(). - Defines the width of the drag shadow to be the full width of the mask
View. - Defines the height of the drag shadow to be the full height of the mask
View. - Sets the dimensions and offset position of the drag shadow on the canvas.
- Adjusts the size parameter’s width and height values.
- Sets the drag shadow touch point position to the middle of the drag shadow.
- Calls
onDrawShadow()after callingonProvideShadowMetrics().onDrawShadow()draws the actual drag shadow on a canvas object using the metrics fromonProvideShadowMetrics(). - Draws the mask’s drag shadow
Drawablein the Canvas.
Now that you have a drag shadow, it’s time to take care of the drag event listeners.
Implementing a Drag Event Listener
When the drag-and-drop process is in progress, the system sends a DragEvent to all the registered drag event listeners.
Next, you’ll implement View.OnDragListener to create a drag event listener object, then set the listener on the View‘s setOnDragListener().
Dispatching Drag Events
The system uses DragEvent to dispatch a drag event along with its associated data and action type. The action type in the DragEvent updates the registered listeners on what’s happening in the drag-and-drop process.
DragEvent defines six action type constants:
- ACTION_DRAG_STARTED
- ACTION_DRAG_ENTERED
- ACTION_DRAG_LOCATION
- ACTION_DRAG_EXITED
- ACTION_DROP
- ACTION_DRAG_ENDED
You can read the summary of each action type in the official Android documentation.
To access the action type constants, invoke getAction() on DragEvent.
DragEvent also contains optional data items valid for a specific action type. Read more about them in the official Android documentation.
Starting a Drag Operation
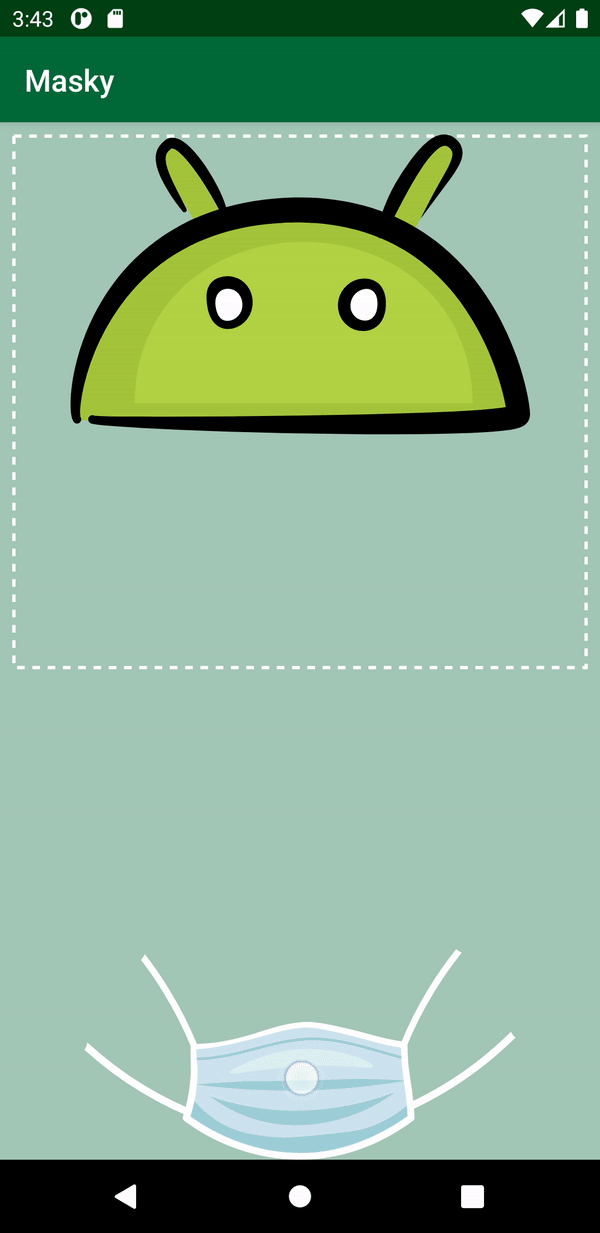
Before starting a drag operation, familiarize yourself with activity_main.xml. This file contains the primary layout for the drag-and-drop feature you’ll implement.
Focus on the following views:
- Mask view: The ImageView.
- Unmasked face: The Bugdroid mascot ImageView.
-
Mask drop area: The
ConstraintLayout, which is the complete area within the dashed line boundary that represents the bounding box for drag enter/exit events.
Open MainActivity.kt and add attachViewDragListener() to it. attachViewDragListener() defines the set of actions to perform to start a drag operation.
Next, import the following packages:
import android.content.ClipData
import android.content.ClipDescription
import android.os.Build
import android.os.Bundle
Then, call attachViewDragListener() in the onCreate() lifecycle callback of your activity:
private fun attachViewDragListener() {

  // 1
  binding.mask.setOnLongClickListener { view: View ->

  // 2
  val item = ClipData.Item(maskDragMessage)

  // 3
  val dataToDrag = ClipData(
      maskDragMessage,
      arrayOf(ClipDescription.MIMETYPE_TEXT_PLAIN),
      item
  )

  // 4
  val maskShadow = MaskDragShadowBuilder(view)

  // 5
  if (Build.VERSION.SDK_INT < Build.VERSION_CODES.N) {
     //support pre-Nougat versions
     @Suppress("DEPRECATION")
     view.startDrag(dataToDrag, maskShadow, view, 0)
  } else {
     //supports Nougat and beyond
     view.startDragAndDrop(dataToDrag, maskShadow, view, 0)
  }

  // 6
  view.visibility = View.INVISIBLE

  //7
  true
 }
}
The code above adds drag start capabilities to the app. Here's how:
- The current layout calls for you to drag the mask view across other views. To do this, you set a long-click listener on the mask view that triggers the drag start.
- Create
ClipDataand ClipData.Item, which represent the data the user is dragging. - Within
ClipData, you include the array of MIME types the data represents, with the help ofClipDescription. If you don't want to support data movement, you can simply pass a null value for the MIME types. - Instantiate a drag shadow builder. You don't need to customize the drag shadow, so you use
the defaultView.DragShadowBuilder(view). - Here, you supply
ClipData, the drag shadow builder and a mask view that you want to drag as arguments tostartDrag(). - Hide the mask view when the drag starts. Only the drag shadow should be visible during a drag operation.
- Return a Boolean
trueto tell the system that the click event was successful.
Build and run. Now, you can finally move the mask.
At this moment, however, your app only supports the drag operation. When you release the mask, it disappears. To let the user drop the mask, you'll add code to respond to events next.
Responding to Drag Events
To respond to drag events, you need to register a drag event listener with the maskDropArea view. Only views that have drag event listeners set can respond to drag events.
To start, open MainActivity.kt And add the following:
// 1
private val maskDragListener = View.OnDragListener { view, dragEvent ->

  //2
  val draggableItem = dragEvent.localState as View

  //3
  when (dragEvent.action) {
    DragEvent.ACTION_DRAG_STARTED -> {
      true
    }
    DragEvent.ACTION_DRAG_ENTERED -> {
      view.invalidate()
      true
    }
    DragEvent.ACTION_DRAG_LOCATION -> {
      true
    }
    DragEvent.ACTION_DRAG_EXITED -> {
      true
    }
    DragEvent.ACTION_DROP -> {
      true
    }
    DragEvent.ACTION_DRAG_ENDED -> {
      true
    }
    else -> {
      false
    }
  }
}
The code above creates a drag event listener. Here's how it works:
- Creates an instance of
View.OnDragListenerand assigns it to a variable,maskDragListener. - Retrieves a reference to the mask view.
- A drag event listener can access
getAction()to read the action type. Upon receiving the drag event, you match the action type to perform appropriate tasks.
Notice that all the branches in the when expression return a Boolean true, except the else branch.
Next, add the following in onCreate():
binding.maskDropArea.setOnDragListener(maskDragListener)
You take a reference to the mask drop area view that will respond to drag events. You then pass the drag event listener, maskDragListener, into the view's setOnDragListener().