Siri Shortcuts on Apple Watch
Learn how to take advantage of Siri and Shortcuts on the Apple Watch without any intervention required from the iOS companion app. By Mark Struzinski.
Defining Suggestions
Finally, in the Suggestions section, set default image to rw-logo and set Summary to Hydration type and amount. These sections determine the prompt users will see when configuring your shortcut from a Siri suggestion.

Defining Siri’s Response
The response node defines how Siri will communicate the result of the shortcut back to the user.
- Select Response on the left sidebar.
- Under success, enter Item Added! for both fields: Voice-Only Dialog and Printed Dialog.
- Under failure, enter Sorry, but I couldn’t add your item. for both fields.
Adding the Intents Extensions
Next, you need to add an extension for the iOS and watchOS platforms. The extensions allow shortcuts to run outside of the app context. The app doesn’t have to be in the foreground for the shortcut to run when the extension is present. Intent extensions enable a lot of different types of interactions. Your users can add actions to shortcuts as part of a large, complex shortcut or as one-offs that just perform a single task. Now, your shortcut actions are available from the Shortcuts app or by voice via Siri.


- In Xcode, select File ▸ New ▸ Target…
- Select iOS at the top for the platform.
-
Under the Application Extension category, select Intents Extension.
- Click Next.
- On the next screen, set Product Name to HydratorIntents.
- Select your team from the Team drop-down.
- Set Starting Point to None. Include UI Extension isn’t checked, Project is Hydrator and Embed in Application is set to Hydrator.
-
Click Finish.
-
Now, repeat that process, but select watchOS for the platform and name the extension HydratorIntentsWatch.
- Ensure the Embed in drop-down is set to HydratorWatch Extension.

Adding Framework Dependencies
Each extension will depend on an underlying framework for data management. You’ll add those now.

- Select each new target in Xcode.
- In Frameworks and Libraries, click + to add the relevant HydratorKit framework.
- For HydratorIntents, add HydratorKit.
- For HydratorIntentsWatch, add HydratorKitWatchOS.
- For HydratorIntents, add HydratorKit.

Configuring for Builds
You need to perform some maintenance work to make the new extensions work with the .xcconfig files you learned about earlier.

- In Project navigator, select the Hydrator project node.
- In Projects, select Hydrator.
- Select the Info tab.
- Under Configurations, in the middle pane, expand Debug and Release.
-
For HydratorIntents and HydratorIntentsWatch, select the appropriate .xcconfig file from the drop-down menu.
Configuring Identifiers
The data storage for the extensions uses app groups to write to a shared location. You need to set up app groups for the new targets for this to work.
- In Project navigator, select the Hydrator project node.
- Select the HydratorIntents target.
- Select the Signing & Capabilities tab on top.
-
Click + Capability.

- In the menu, select App Groups and click Enter.
- Repeat this process for the HydratorIntentsWatch target.
- This process generates an entitlements file inside each respective extension group.
Enabling Entitlements Files
For each entitlements file, perform the following steps:
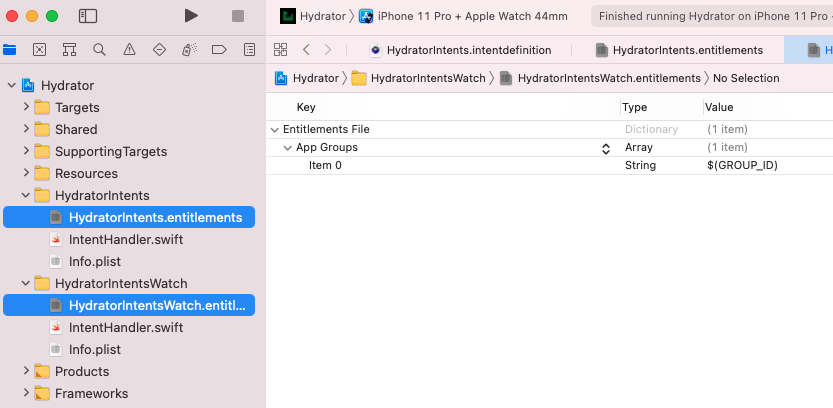
- Select the entitlements file in Project navigator.
- Expand the App Groups node.
- Click + to add a new entry to the array.
- In the Value column, add the variable $(GROUP_ID).

Now your Group ID maps to the variable in the .xcconfig files.
Updating Info.plist Files
Next, you need to update the Info.plist files in the new targets to declare support for the intent.
In each plist for the new targets, do the following:
- Open NSExtension.
- Next, open NSExtensionAttributes.
- Then, open IntentsSupported.
- Click + to add a new array item.
- Add TrackIntakeIntent as the value for the new item.

This step allows the system to invoke the right class when Siri uses the intent. Next, you’ll move on to code generation for your intent and creating a shared handler.
Generating Intent Code
Now, you need to set up code generation options for the intent. Xcode can create the correct classes for you based on your intent setup. You’ll interact with these generated classes when you create the shared intent handler.
Set up the following:
- Select the intent definition file in Project navigator following the path: Hydrator ▸ Shared ▸ Resources.
- Open File inspector by pressing Command-Option-1.
- Under Target Membership, select all targets.
-
The property to the right of each target is the code generation scheme.
Set up the following:
- For the Hydrator, HydratorWatchExtension, HydratorIntents and HydratorIntentsWatch targets, ensure No Generated Classes is selected.
- HydratorWatch won’t allow any changes and is set to No Role.
- For HydratorKit and HydratorKitWatchOS, select Public Intent Classes.

Sharing Intent Handling
You’ll set up both intent extensions to use the same code to centralize intent handling in one place. You can now use the types generated from your intent definition file.
- Navigate to the Shared group in Project navigator.
- Open Source inside it.
- Create a new group named Intents.
- Create a new Swift file named TrackIntakeIntentHandler.swift.
- In Target Membership for this file, select HydratorIntents and HydratorIntentsWatch. Deselect all other targets.
Now you’re ready to set up your shared intent handling code. At the top of the file, add the following code:
#if os(iOS)
import HydratorKit
#else
import HydratorKitWatchOS
#endif
The compiler directive above selectively imports the correct framework depending on which platform is active.
Next, create the class declaration:
class TrackIntakeIntentHandler: NSObject, TrackIntakeIntentHandling {
}
You’ll get an error that the class does not conform to TrackIntakeIntentHandling. This is your first use of one of the generated classes resulting from your intent definition file. Command-click into the definition of this protocol to see the generated header, and you’ll see something like this:
@available(iOS 12.0, macOS 11.0, watchOS 5.0, iOS 12.0, *)
@available(tvOS, unavailable)
@objc(TrackIntakeIntentHandling) public protocol TrackIntakeIntentHandling : NSObjectProtocol {

    @objc(handleTrackIntake:completion:) func handle(intent: HydratorKit.TrackIntakeIntent, completion: @escaping (HydratorKit.TrackIntakeIntentResponse) -> Void)

    @available(iOS 13.0, macOS 11.0, watchOS 6.0, *)
    @objc(resolveOuncesForTrackIntake:withCompletion:) func resolveOunces(for intent: HydratorKit.TrackIntakeIntent, with completion: @escaping (HydratorKit.TrackIntakeOuncesResolutionResult) -> Void)

    @available(iOS 13.0, macOS 11.0, watchOS 6.0, *)
    @objc(resolveHydrationTypeForTrackIntake:withCompletion:) func resolveHydrationType(for intent: HydratorKit.TrackIntakeIntent, with completion: @escaping (HydratorKit.HydrationTypeResolutionResult) -> Void)

    @objc(confirmTrackIntake:completion:) optional func confirm(intent: HydratorKit.TrackIntakeIntent, completion: @escaping (HydratorKit.TrackIntakeIntentResponse) -> Void)
}
Back in TrackIntakeIntentHandler.swift, click Fix in the error message. Xcode will generate the appropriate method stubs for you.