Siri Shortcuts on Apple Watch
Learn how to take advantage of Siri and Shortcuts on the Apple Watch without any intervention required from the iOS companion app. By Mark Struzinski.
Executing the App Remotely
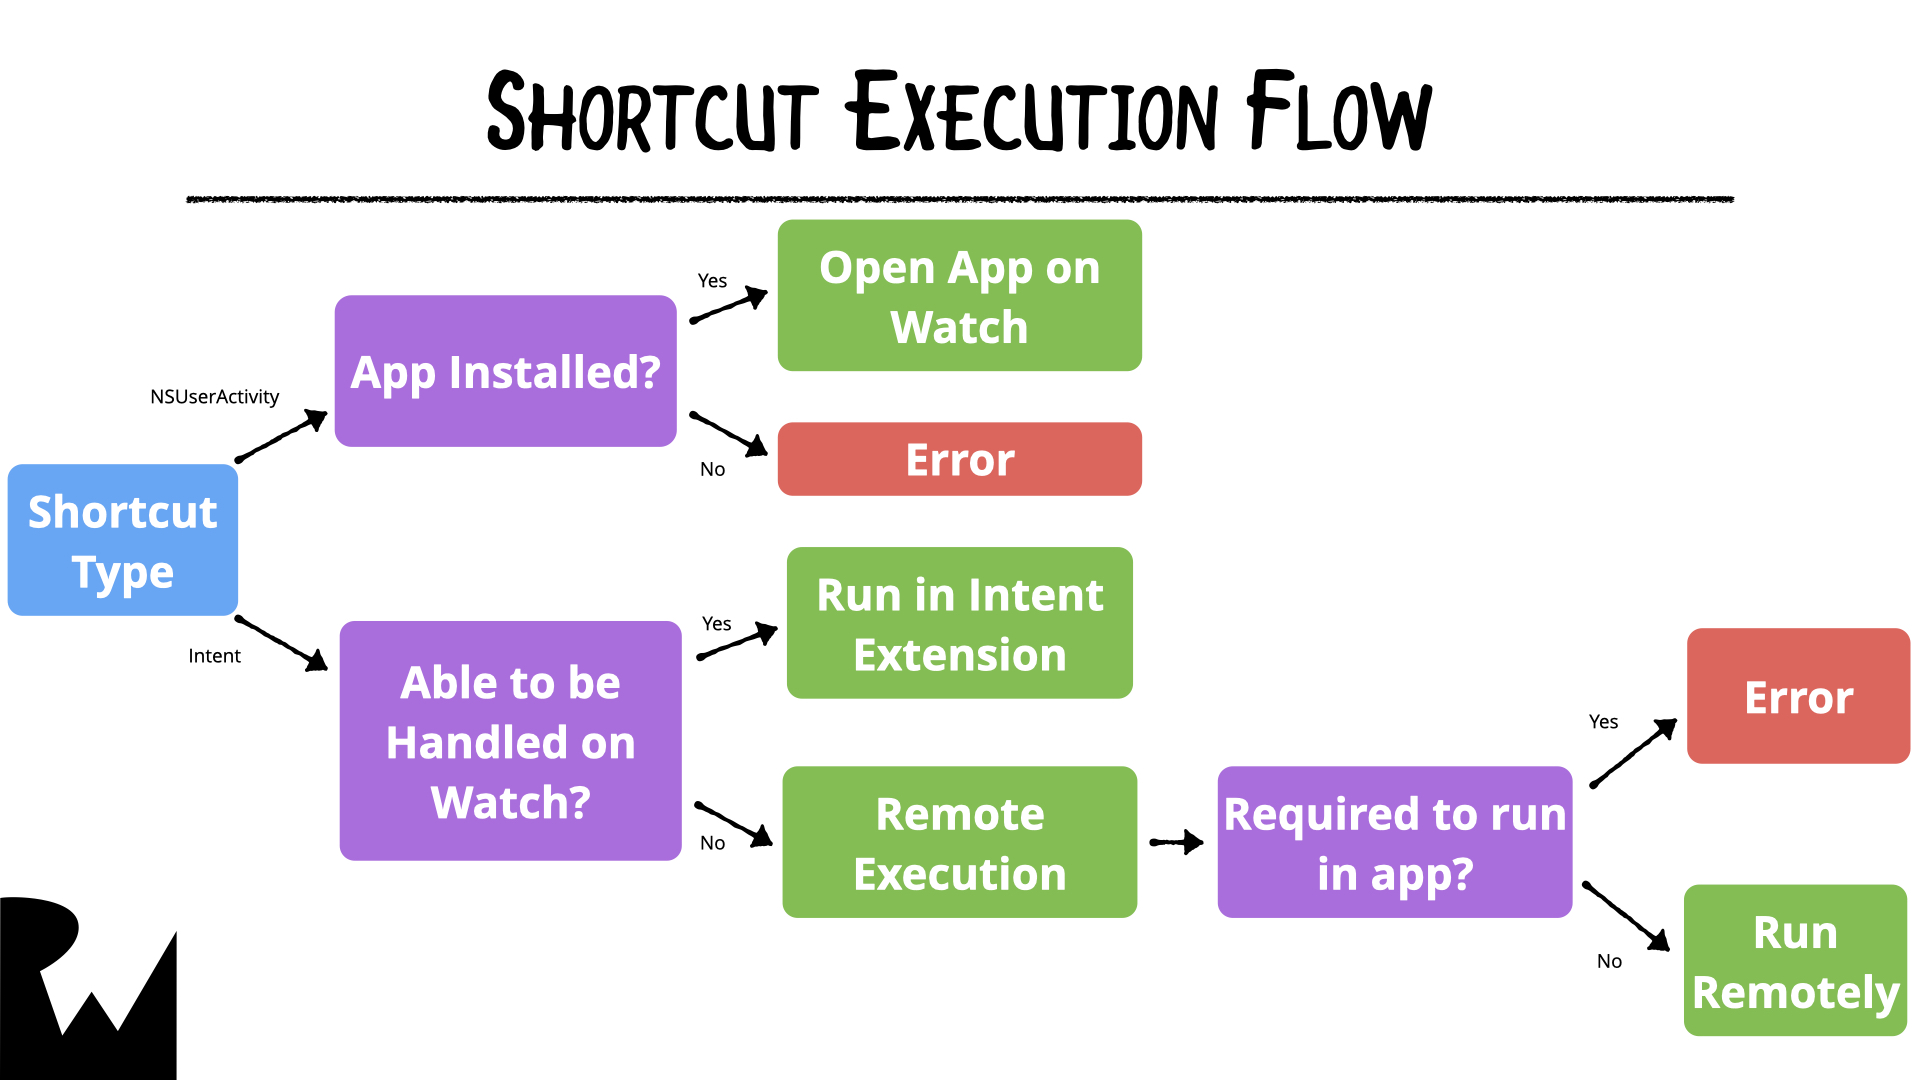
Although remote execution offers a layer of flexibility when running shortcuts from the watch, it’s not the recommended approach. If possible, Apple recommends shipping a watch app with an intents extension to ensure shortcuts that start from the watch execute locally instead of running remotely. The main drawback to remote execution is time, as it takes significantly longer to run than a shortcut.
This chart illustrates an example of the decision flow between watchOS and iOS for executing shortcuts when they begin from the watch:
Adding an Intent-Based Shortcut
As discussed in the previous section, you’ll focus on intent-based shortcuts for this tutorial because of their flexibility and ability to run in a standalone fashion. You’ll ensure the shortcut can run without encountering an error state and can run locally on the device. For a watch app, that means the shortcut shouldn’t invoke remote execution to run partially on the phone. Skipping remote execution prevents costly wait times in end-to-end communication between the phone and watch apps.
The watchOS app can only run shortcuts created on iOS and marked for sync over to the watch. Because of this, you’ll create your intent and add it to iOS first. Once you have that up and running, you’ll sync it over to the watch and get it running there.
Everything starts with an intent definition file.
Adding the Intent Definition File
An intent definition file bridges available shortcut functionality from your app and makes it available to the Shortcuts app. Your users can configure shortcuts with a wide range of possibilities and plug into your app’s ability to accept input and perform actions. Add an intent definition file to the project:

- Open Project navigator by pressing Command-1.
- Select Shared ▸ Resources.
- Then, select File ▸ New ▸ File…
- Next, select the iOS filter at the top.
- Under the Resource section, select SiriKit Intent Definition File.
- Click Next.
- Name the file HydratorIntents.intentdefinition.
-
Select all targets in the Targets section on the bottom.
Configuring Types
Intent types define objects that your intent expects as parameters. In the intents file, you have the option of defining custom types and enumerations to represent items in the shortcut flow. For this tutorial, you’ll define an enumeration to represent drink choices when tracking hydration intake.
Inside the intent, configure an enum to represent different drink options:

- With the new intent file selected, click + at the bottom and select New Enum.
- Name it HydrationType.
- Leave the Display Name as Hydration Type.
-
Under Cases, add the following by clicking + for each new entry:
- water, display name: Water.
- coffee, display name: Coffee.
- energyDrink, display name: Energy Drink.
- tea, display name: Tea.
- seltzer, display name: Seltzer.
Configuring a New Intent
Now, you’re ready to create a new intent. Per Apple, intent names should follow a VerbNoun convention.
Set up your new intent as follows:

- With the intent file selected, click + at the bottom and select New Intent.
- Name it TrackIntake.
- Under Category, select Create.
- Set the Title to Track Intake.
- Then, set Description to Track hydration intake.
- Leave the Confirmation and Widgets options unchecked.
-
Leave the Configurable in Shortcuts and Suggestions options checked.
Setting up Intent Parameters
Intent parameters are a great addition to the SiriKit framework. Parameters make your shortcuts much more dynamic. The Shortcuts app can find parameters in your intent definition and make them available to users when setting up shortcuts into your app.
You’ll set up two parameters to handle hydration intake. Combining these two parameters will allow you to create a new log entry in the app from the shortcut.
Set up your first parameter as follows:
- Click + under the Parameters section.
- Name the parameter ounces.
- Leave Display Name as Ounces.
- Set the Type as Integer.
- Leave Configurable and Resolvable checked.
- Keep Default Value and Minimum Value at 0 and set Maximum Value to 200.
- Under Siri Dialog, set Prompt to Amount of intake.
- Leave Validation Errors as-is.

Explaining Parameters
Here’s what those fields mean for the Siri and Shortcuts interface.
- Display Name is the name that shows in the Shortcuts app as a prompt for input.
- Type is the data type expected as the result of the parameter value.
- The Configurable check allows the user to configure custom values for this parameter in the Shortcuts app.
- The Input section defines default, minimum and maximum values for the integer input. For other input types, these fields will update appropriately.
- The Siri Dialog prompt displays when Siri is prompting the user for this input parameter.
- Validation Errors notify the user when an input parameter is invalid. They use tokens to represent error and data types. This allows you to create dynamic error messages for display to the user when a parameter is invalid.
Understanding More Parameters
Now, move on to the second parameter. This one is for the drink type. For this, use the DrinkType enum you defined earlier:
- Click + under Parameters.
- Name the parameter hydrationType.
- Leave Display Name as Hydration Type.
- Set type to Hydration Type.
- Under Input, set Default Value to Water.
- Under Siri Dialog, leave all values at defaults.

There’s one difference between the ounces parameter and the hydrationType parameter. For ounces, validation errors are possible. The ounces value could be invalid due to a user input error. For hydrationType, the user selects from a generated list based on the enum. In that scenario, you’ll never have invalid data.
However, you could have a scenario where Siri is unable to distinguish what the user said for the selection. In this case, you can provide disambiguation prompts. When this happens, the user will see the text entered in the Disambiguation Prompt field. You’ll learn more about disambiguation when you create the intent handler for this intent.
Configuring the Shortcuts App
This section defines the user’s interaction experience with your shortcut actions in the Shortcuts app.
- Leave Input Parameter and Key Parameter set to None.
- Under Summary, enter Hydration type and amount.