Swift Accelerate and vImage: Getting Started
Learn how to process images using Accelerate and vImage in a SwiftUI application. By Bill Morefield.
Instantiating the Wrapper
Inside the sheet(isPresented:onDismiss:content:), replace print("Dismissed") with the following:
let imageWrapper = VImageWrapper(uiImage: originalImage)
processedImage = imageWrapper.processedImage
This code instantiates the wrapper with the selected image and then assigns the processedImage property of the object to the processedImage property of the view. Because you’re not changing the image yet, you’ll see the processed image matches the original one.
Build and run. Tap Select Photo and choose any photo in the simulator other than the red flowers. You’ll see things look good.

But, as you might have guessed from that restriction, there’s an issue. Tap Select Photo and choose that photo of the red flowers, and you’ll see things are a bit upside down.
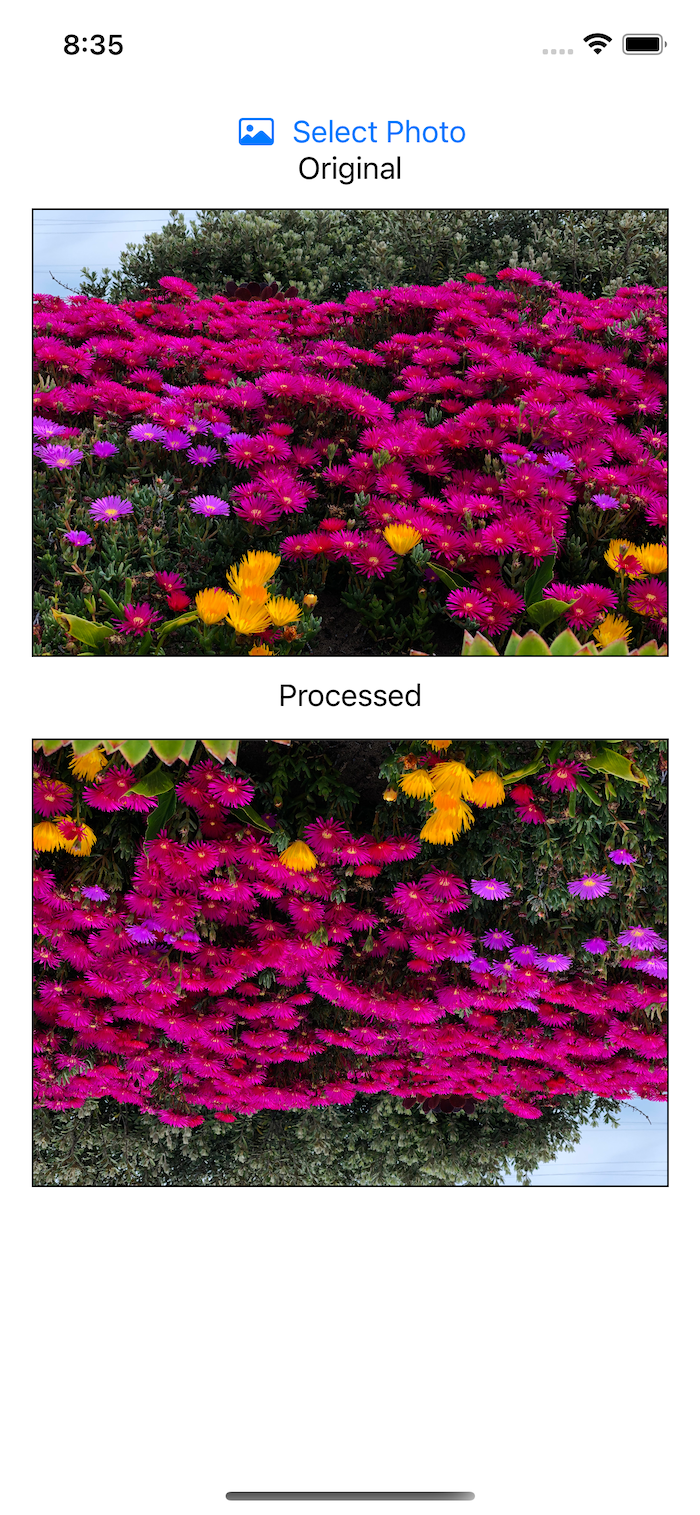
The processed photo looks upside down. Specifically, it’s rotated 180° from the original. What’s causing the rotated image? You’ll fix that now.
Managing Image Orientation
The rotated image bug comes in the conversion back to a UIImage. Remember from earlier that the vImage_Buffer contains only the raw pixel data for the image. There’s no context for what those pixels mean. During the conversion back to a UIImage, you created a vImage_CGImageFormat based on the original CGImage to provide that format. So what’s missing?
It turns out that a UIImage holds more information about an image than a CGImage. One of those properties is the imageOrientation. This property specifies the intended display orientation for an image. Typically this value will be .up. But for this image, it reads .down, defining that the displayer should rotate the image 180° from its original pixel data orientation.
Because you don’t set this value when converting the vImage_Buffer back to a UIImage, you get the default of .up. The simple fix: Use the information of the original UIImage when doing the conversion.
Open VImageWrapper.swift and find the convertToUIImage(buffer:). Change the let image = ... line to read:
let image = UIImage(
  cgImage: cgImage,
  scale: 1.0,
  orientation: uiImage.imageOrientation
)
This constructor allows you to specify the orientation when creating the image. You use the value from the original image’s imageOrientation property.
Build and run. Tap Select Photo and choose that photo of the red flowers. You’ll now see the processed image looks correct.

Image Processing
Now that you can convert an image to and from the format vImage requires, you can start using the library to process images. You’re going to implement a few different ways to manipulate images, playing around with their colors.
Implementing Equalize Histogram
First, you’ll implement the equalize histogram process. This process transforms an image so that it has a more uniform histogram. The resulting image should have each intensity of color occur almost equally. The result is often more interesting than visually appealing. But it’s a clear visual distinction on most images.
To begin, open VImageWrapper.swift. Add the following method to the end of the struct:
// 1
mutating func equalizeHistogram() {
  guard
    // 2
    let image = uiImage.cgImage,
    var imageBuffer = createVImage(image: uiImage),
    // 3
    var destinationBuffer = try? vImage_Buffer(
      width: image.width,
      height: image.height,
      bitsPerPixel: UInt32(image.bitsPerPixel))
    else {
      // 4
      print("Error creating image buffers.")
      processedImage = nil
      return
  }
  // 5
  defer {
    imageBuffer.free()
    destinationBuffer.free()
  }
}
This code sets up the values needed for the image change. The conversion to a buffer should look familiar, but there’s some new work because you need a place to put the image processing results:
- With a struct, you must declare the method
mutatingso you can update theprocessedImageproperty. - You get the
CGImageof theUIImagealong with avImage_Bufferfor the original image. You’ll see why you need theCGImagein a later step. - Some processing functions place the results back into the original buffer. Most expect a second destination buffer to hold the results. This constructor allows you to specify the buffer’s width and height along with the number of bits used for each pixel in the image. You obtain these values from the
CGImageobtained in step two. - If any of these steps fails, then the method prints an error to the console, sets the
processedImageproperty toniland returns. - When you create a
vImage_Buffer, the library dynamically allocates memory. You must let the library know when you have finished with the object by callingfree(). You wrap this call inside adeferso that it is called whenever this method returns.
Processing the Image
With the setup done, you can now process the image. Add the following code to the end of the equalizeHistogram():
// 1
let error = vImageEqualization_ARGB8888(
  &imageBuffer,
  &destinationBuffer,
  vNoFlags)

// 2
guard error == kvImageNoError else {
  printVImageError(error: error)
  processedImage = nil
  return
}

// 3
processedImage = convertToUIImage(buffer: destinationBuffer)
You can see after the setup that the actual image processing takes little code:
-
vImageEqualization_ARGB8888(_:_:_:)takes three parameters. The first and second are the source and destination buffers you created. You pass thevNoFlagsconstant you defined earlier because you have no special instructions for this function. This is the function that performs the actual histogram equalization for you. - You check to see if there was an error in the function. If so, then you print the error to the console. Afterward, you clear the
processedImageproperty and return from the method. As a reminder, thanks to thedeferkeyword, thefree()executes now. - You now convert the buffer back to a
UIImageand store it in theprocessedImageproperty. If the method made it here and didn’t return earlier due to error, then now is when thefree()will be called on the buffers thanks to thedeferblock.
Note the _ARGB8888 suffix on the vImage. Because the buffer specifies only image data without context, most vImages exist with several suffixes that treat the data as the indicated format.
This format specifies that the image data will contain the alpha, red, green and blue channels in that order for each pixel. The numbers identify that each channel consists of eight bits of information channel per pixel.