Pathfinding With NavMesh: Getting Started
Characters in a game often need to navigate around obstacles in the level. Because this is such a common situation in games, Unity provides a built-in pathfinding solution, called NavMesh. In this tutorial, you’ll implement point-and-click movement using NavMesh. By Joseph Hocking.
Removing an Object from the NavMesh
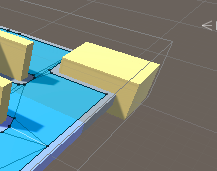
But there’s another issue. With NavMesh still selected, look at the large corner block. The blue square on top means the navigation system sees it as part of the floor — that is to say, a surface that can be part of a valid path. The player should be able to walk only on the floor, not on top of the walls! But you can’t ignore that block as you did with the player. It still needs to be an obstacle so that NavMesh won’t generate paths through it.
Luckily, you can handle this with another component, called NavMeshModifier. Here are the steps to set it up:
- Look in the children of Maze and select Corner.
- Add a NavMeshModifier component.
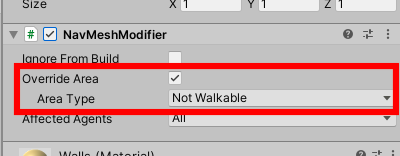
- On the component, click to enable Override Area.
- Change Area Type to Not Walkable.
Override Area setting in NavMeshModifier component
Override Area setting in NavMeshModifier component
Now, Unity understands that Corner is an obstacle rather than a walkable surface. Click NavMesh and bake the navigation mesh again. Problem solved!
Just a regular wall again.
Just a regular wall again.
With those tweaks, you’ve set the navigation up correctly. You’re ready to get your player running around in the maze!
Moving a Character
Moving an object around on a navigation mesh is the job of the NavMeshAgent component. It calculates a path along the mesh from its current position to whatever destination you give it (or the closest point, if it’s not on the mesh).
Setting Up the NavMeshAgent Component
To begin, select the player and add a NavMeshAgent component.
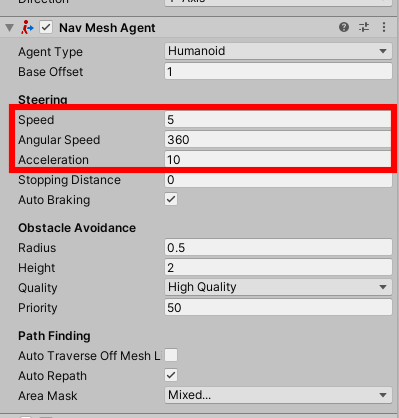
The default settings for the agent’s movement are a little sluggish, but you can tweak them to be snappier. On NavMeshAgent, increase Speed to 5, Angular Speed to 360, and Acceleration to 10.
Steering settings in NavMeshAgent component
Steering settings in NavMeshAgent component
Now, you just need a script to set the NavMeshAgent‘s destination, and NavMesh will take care of the rest!
Setting the NavMeshAgent’s Destination
Create a new C# script called PlayerMovement.cs in the Assets/RW/Scripts directory. Add this requirement at the very top of the class, above the class definition:
using UnityEngine.AI;
This library makes the NavMesh classes available.
Next, declare these two variables at the top of the class:
private Camera cam;
private NavMeshAgent agent;
Add these lines to Start:
cam = Camera.main;
agent = GetComponent<NavMeshAgent>();
The Camera class has a convenient method that translates the mouse’s location on the screen to a position in the game world. Pass that position to agent as its destination.
Add the following to Update :
if (Input.GetMouseButtonDown(0))
{
    Ray ray = cam.ScreenPointToRay(Input.mousePosition);

}
This code checks each frame to see if the mouse button is pressed. If so, it constructs a Ray from the camera to the mouse’s position. You’ll use the ray in the next step.
Next, add these lines inside the if statement, after creating the ray:
if (Physics.Raycast(ray, out RaycastHit hit))
{
    agent.SetDestination(hit.point);
}
This code sends the ray out into the game world and checks whether it hits anything. (Note that the ray will only hit objects that have colliders.) If the ray does hit something, it will store the location of the hit in hit.point. Then, you can simply give that location to agent as its destination.
Drag this script onto the player object and press Play. Click anywhere on the maze, and the player moves where you clicked! The player navigates around the mazelike walls to reach the destination.
Refining the Navigation Mesh
Now that the character is successfully moving around the maze, you can make the navigation mesh a bit more interesting by specifying navigation areas and costs. You’ve actually already adjusted one navigation area, when you set the corner block to Not Walkable. But you can do much more than just turn areas on and off.
To represent a more complex environment, you can designate different areas that have costs — weights defining how difficult (or undesirable) that area is to move through. NavMesh agents will tend to avoid high-cost areas even if a path crossing that area is technically shorter. Think of military units moving over varied terrain: The path might be shorter if they cut through the mountains, but they prefer to go around the mountain through open fields. It is simple to represent this situation using areas of varied cost in the navigation mesh.
In the sample scene, notice that one chunk of the floor is blue. You can assign a separate navigation area there to simulate an area of water that the navigation agent will avoid.
Assigning Navigation Areas
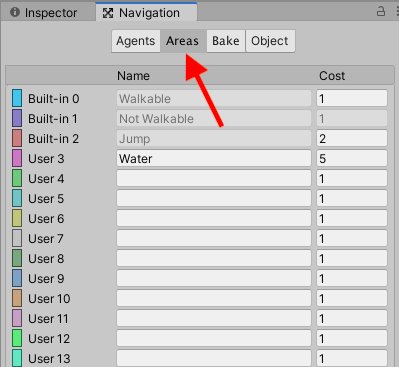
First, add a new area to the navigation system. Select Window ▸ AI ▸ Navigation to open the project navigation settings. Then, select the Areas tab to see all the navigation areas defined in this project. Type the name Water in the first available row and set its cost to 5.
List of areas and costs in the Areas tab of the Navigation window
List of areas and costs in the Areas tab of the Navigation window
Go back to the Scene view. Look in the children of Maze and select Water. (You may need to select the Inspector tab to see it again if it is behind Navigation.) Add a NavMeshModifier component, turn on Override Area and change Area Type to Water. Then bake the mesh once more.
Navigation mesh with Water area shown in purple
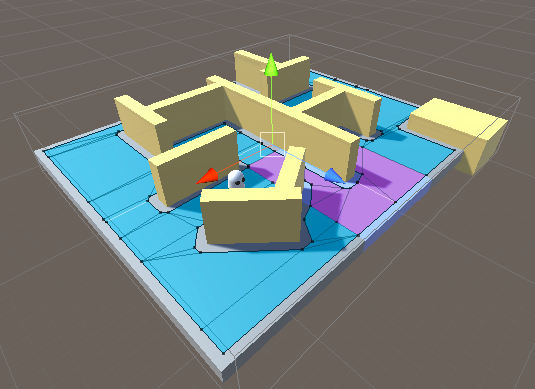
Navigation mesh with Water area shown in purple
Press Play and click around on the mesh to see how the player’s pathfinding changed. For example, try putting the player in the top-right corner, and click just below the corner block. The shortest path to this destination would cut through the water. Instead, the player navigates the long way around.
Position the player at the top right, then click where the X is.
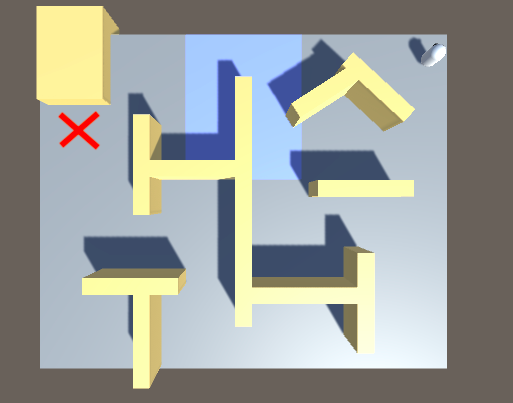
Position the player at the top right, then click where the X is.
Where to Go From Here?
Download the completed project files by clicking the Download Materials button at the top or bottom of this tutorial.
You now know the basics of pathfinding with NavMesh in Unity! Remember the three main components: NavMeshSurface, NavMeshModifier and NavMeshAgent.
There’s a lot more you can do with the NavMesh system. You might define different kinds of agents using the NavMeshAgent settings, create characters who walk on walls or ceilings, or explore linking multiple meshes together. Or you might try out runtime generation next. “Runtime generation” refers to creating a navigation mesh while the game is running, rather than baking one ahead of time as you did in this tutorial.
Although NavMesh is free and works well, many developers prefer A* Pathfinding Project. If you require pathfinding for your game, check that out, too.
I hope you enjoyed this tutorial! If you have any questions, comments or suggestions, feel free to leave them in the comments below or to visit our forums.